Making Miguel Ases Style Jewelry
There are two main components to making Miguel Ases style jewelry - learning how to stitch the beads to make the various shapes and finding beautiful bead color and finish combinations.I'm going to try to tackle both of those areas bit by bit - starting with a basic stitch and color combination and gradually varying it over subsequent projects.
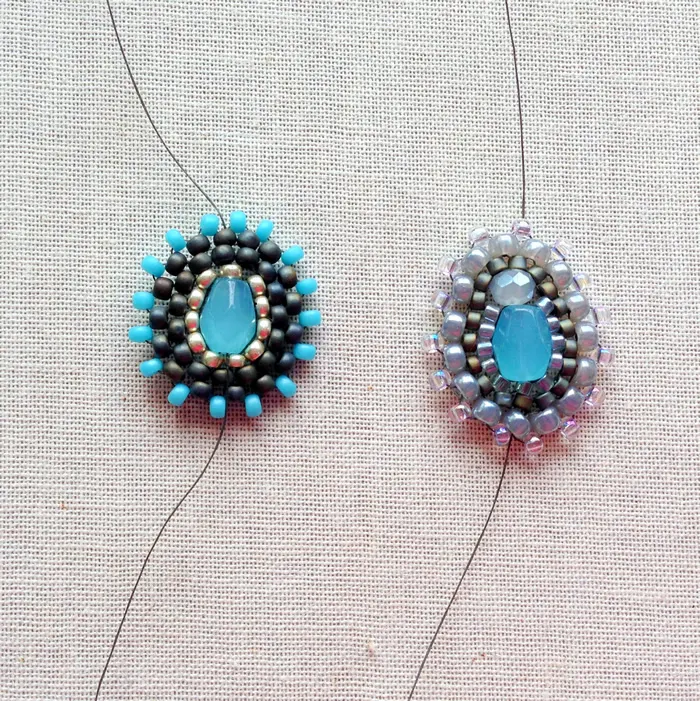
Here's an example: I started with a basic stitch and only one size bead in different colors on the first round component.
On the second component, I used the same center bead, but used a variety of other bead shapes and sizes. I had to vary the thread tension to include a different shape and sized bead (the crystal) - which changed the shape of the component slightly. It's more of a drop shape than oval.
On the last component, I used the same center bead and crystals, but included more of the crystals - which elongated the component shape even more. I also figured out how to align the crystal beads over the center focal bead better and left the outside edge smooth.
The basic color scheme is similar due to the center bead being the same, but I experimented by adding more colors and changing where the dark color is - either in the center or out one layer, etc.
All of these beaded components could be used in earrings, bracelets or any other type of jewelry. The first on the left is the project I'll write the instructions for today.
Circular Brick Stitch Around a Bead
If you've never done brick stitch, here are a couple of helpful free tutorials.
Picture tutorial (in Chinese) but good pictures
This free tutorial from Cut Out and Keep is the exact pattern for these earrings - including the picot style edging. It uses illustrations rather than pictures which may be easier for some people to follow.
Materials for this project
Smoke Fireline beading thread, 6 lb (size D)
Size 12 bead needle
Translucent aqua faceted cat's eye bead drop 7x5 mm
11/0 beads in Shiny Silver, Hematite Iris Matte and Turquoise Blue Matte
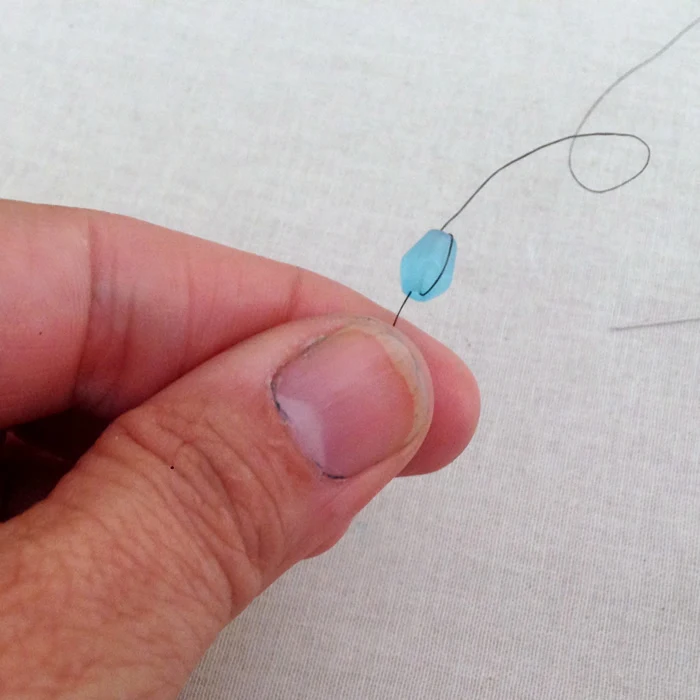
Thread the needle
I know this seems way too silly to put here, but do you really know the easiest way to thread your needle? Yes, like all things in life, there are tricks to make it easier.
Cut the Fireline end so it's sharp. Flatten the last 1/8 to 1/4 inch by sliding it between your front teeth or between the jaws of smooth pliers (I use my teeth). It will flatten and spread a little, making it so much easier to fit in the eye of the needle.
Here's the other thing not everyone knows. Don't move the thread into the eye of the needle, move the eye of the needle onto the thread. What's the difference? Try it and you'll see. It's easier to move the eye of the needle onto the thread. I don't know why - it just is.
Step by Step Instructions (almost)
This is the part where I take you step by step through how to make this Miguel Ases style earring component - until I make a mistake and stop taking pictures.
Ah, well - it's really not as bad as it sounds - it's good practice - and I teach something you rarely see, how to undo stitches when you make a mistake!
Ah, well - it's really not as bad as it sounds - it's good practice - and I teach something you rarely see, how to undo stitches when you make a mistake!
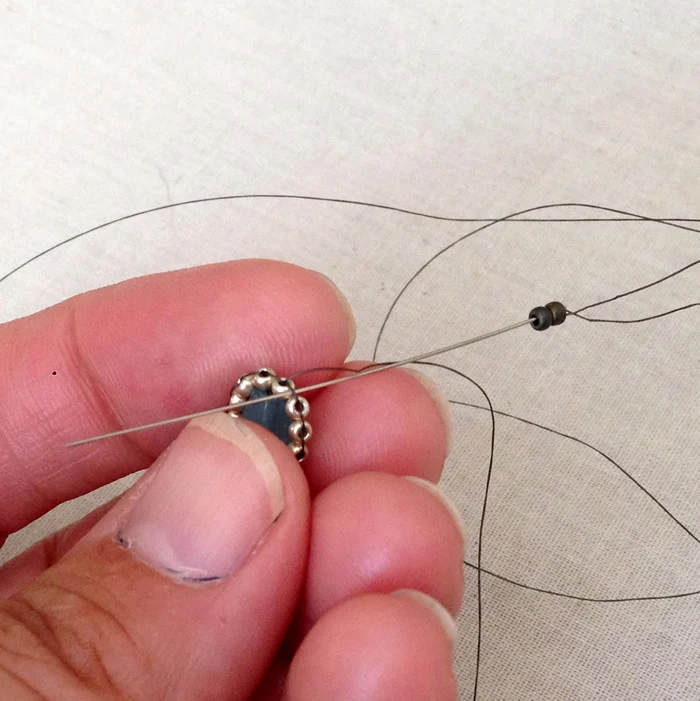
Brick stitch around a bead is secured to threads running around the outside of the bead. The first step is to loop around the side of the bead by putting your needle back in through the bottom and pulling tight.
Make sure you leave at least a 6 inch tail out the bottom of the bead. You will need enough thread to add the needle to the end and weave the thread into the component - and possibly add a connector like a jump ring. It's always better to be safe than sorry on this.
Make sure you leave at least a 6 inch tail out the bottom of the bead. You will need enough thread to add the needle to the end and weave the thread into the component - and possibly add a connector like a jump ring. It's always better to be safe than sorry on this.
Make another thread loop on the other side of the bead by putting your needle into the bottom again and pulling tight - guiding the thread loop to the other side of the bead.
Repeat once more on each side so there are two thread loops on each side. This gives you a strong base to secure your beads to.
Every first row starts by you picking up and securing two beads. Pick up two beads and put your needle under the thread wraps. I put my needle in from the back and push it towards me. I think you can do it the other way - just be consistent however you choose to stitch.
Pull the beads close to the center bead. Stitch through the second bead by going through the hole on the end closest to the needle.
Pull tight so the beads lay flat. You usually need to adjust the first bead because it tends to pop up.
Add the third bead using the same technique. Pick up the bead on the needle, insert the needle under the thread near the other two beads.
Pull the thread through and stitch up into the hole in the bead closest to the needle. Pull to tighten. Continue adding beads in this manner until you have reached the first bead in the row.
One of the skills you need to learn is when to leave a space and when to add another bead. It's trial and error.
In general, you only want to add a bead if there is more than enough room for it to fit. It's far better to have a slight gap with thread than it is to have too many beads - which causes them to buckle and curve.
After attaching the last bead, secure it to the first bead in the round by stitching from top to bottom through the bead, making sure the needle ends up behind the focal bead if you stitch from front to back like I do.
Pull the thread tight and then slide your needle under the threads wrapped around the focal bead - so your needle ends up on the front side and the bead is secured to the one beside it (the last bead in the row) and also to the thread around the focal.
To complete the stitch, go back up through the first bead of the round and pull tight.
Every round starts with two beads.
Pick up two beads, insert your needle under the bridge between beads 1 and 2 of the first round. Pull tight, insert your needle back into the second bead and push the beads so they lay flat.
Pick up one bead, stitch through the bridge, back up through the bead and pull tight. Continue to add beads by threading your needle through the bridge of thread connecting the beads on the prior round.
Once you are familiar with the stitch, the hardest part of working in the round is that you will evenually need to stitch more than one bead in the bridge to keep your circle getting larger - or know how to adjust your thread tension and spacing to make the round get larger. Really, you need to practice a little of both.
There will be some point that you will be adding new beads and the next bridge in order seems too far away from the bead you are adding. When that happens, you will work two beads in one bridge - the first bead will be pulled way to the beginning of the bridge and the second bead will be pushed to the far edge of the bridge. I'll try to get a picture of this on my next post.
Eventually, you will complete several round and feel really good about yourself... until you realize that you goofed and the last round was supposed to be a picot.
A picot is the same stitch, but with an added bead so that you end up with a scalloped edge. Both of these components have a picot - even though the second one is hard to see because of the light color beads.
Update: See this post on how to make the picot edge.
How to remove stitches from your circular brick stitch
That brings me to an important skill that you just don't see people write about enough - how to remove stitches and beads when you goof.
There's no other way to remove stitches than to back them out. If it's only one or two stitches, I try to stitch back through the path - but that's risky because if you accidentally sew through the thread (called splitting the thread), you end up with a bigger mess on your hands. Besides weakening your bead work, splitting the thread makes it much easier to end up with a knot - which means you may end up starting all over or getting very creative about adding a new thread... Both topics for another day.
It's far better to take the needle off the end, place it between the bridge on top of the last two beads, and gently lift the thread to pull loosen and eventually remove the bead. Repeat as many times as necessary until you are back to where you can continue correctly.
I did manage to fix this component, so if you go slow and steady, it can be done.
Here are some other tutorials for circular brick stitch that you may find helpful:
One more great tip:
Did you know you can get my blog posts delivered directly to your email? It's true! You just need to click the subscription link below, follow the instructions AND respond to the confirmation email.
By email: You can sign up by providing your email and you will be notified of new blog posts plus special offers. Make sure you confirm your subscription request by clicking the link in the email.
By following me on Pinterest: Lisa Yang Jewelry on Pinterest
By subscribing on YouTube: Lisa Yang Jewelry on YouTube
And Instagram: @lisayangjewelry


Omg..i thought i was the only one that bites the end of the fishing string..good job
ReplyDeleteFantastic !
ReplyDeleteSo happy to have found these Miguel Ases style tutorials l ... thanks for sharing them and please keep them coming!
ReplyDeleteThanks the only other Miguel Ases pattern were the JLO earrings. No tutorial but I. Figured them out picture attached whew!! My daughter loves them
ReplyDeleteWhat size do you suggest for the center bead?
ReplyDeleteI don't think there's a specific size, but there are characteristics that make it easier to bead around. A round bead or oval bead are easiest to learn on - probably at least 8-10mm since it is easier to hold. Flat beads are challenging because the thread can slip off the sides, so wide flat sides are helpful. It's a lot of learning by practice. Good luck and most of all, have fun!
DeleteHow do you do the pointed ones?
DeleteWhat size do you suggest for the center bead?
ReplyDeletehello ! can you tell me please what size of the bead? swarovski in austria sells those sizes:
ReplyDeleteSwarovski 5328 Xilion 4mm
Swarovski 5328 Xilion 6mm
Swarovski 5328 Xilion 6mm
Swarovski 5328 Xilion 8mm
are those the right ones? and which size?
thanks so much! i am looking forward to have a lockdown experience;)
how long do u think we will take for the whole earings? thank you!!
8mmhttps://www.kronjuwelen.com/Perlen/Swarovski-Perlen/Swarovski-5328-Xilion-Bead/?force_sid=t9vupifpnv6rg5bfgqeehtuam8