Beginner’s Guide to Bead Embroidery
Bead embroidery combines stitching and surface design to attach beads directly onto a foundation fabric. Unlike bead weaving, which builds beadwork off-thread alone, bead embroidery is constructed on a base material and later finished with backing and edging.
It is ideal for cabochon pendants, statement earrings, cuffs, brooches, and mixed media jewelry.
If you are new to bead embroidery, this guide covers the essential supplies, basic stitches, and how to complete your first project.
What Is Bead Embroidery?
Bead embroidery is the process of sewing beads onto a fabric-like foundation using a needle and thread. The design grows outward from a focal element such as:
- A cabochon
- A crystal
- A stone
- A bead embroidery component
Once complete, the piece is trimmed, backed, and finished with an edge stitch.
Unlike loom or off-loom bead weaving stitches such as peyote, square stitch or herringbone, bead embroidery relies on foundation support for structure.
Essential Bead Embroidery Supplies
You do not need an extensive toolkit to begin, but choosing the right materials makes bead embroidery easier and yields more professional looking results.
Bead Embroidery Foundation Material
The foundation is the base material that you stitch into while creating the beadwork.
Common options include:
A good bead embroidery foundation should be firm enough to prevent puckering from the stitches but still easy for a needle and thread to pass through. The stability allows you to stitch comfortably without using an embroidery hoop.
Some bead embroiderers use Pellon Peltex stabilizer as a foundation. Peltex is stiff so many artists baste or fuse a thin fabric such as cotton or Ultrasuede to the front side before stitching so the needle passes through more easily and the surface is smoother.
Beading Thread
Strong, low-stretch thread is important.
Common choices:
Nylon threads provide flexibility and are easy to work with. FireLine offers extra strength and is useful for heavier beadwork or cabochon bezels.
Avoid regular sewing thread, which tends to fray and wear down against beads.
Beading Needles for Bead Embroidery
Use thin, flexible beading needles that pass through small seed beads easily.
-
Size 10 or 12 beading needles work well for most projects.
Beads

Bead embroidery typically uses:
- Size 11/0 seed beads
- Size 15/0 seed beads
- Accent beads (drops, crystals, rondelles)
- Cabochons or focal stones
Consistent bead sizing helps maintain smooth stitch lines. Culling out slightly larger or smaller seed beads can help fill gaps when you encounter a slightly larger or smaller space in the design.
Backing Bead Embroidery and Finishing Edges

After the bead embroidery is complete, the foundation is trimmed close to the stitched design. At this stage, the back of the piece will show thread stitches and the foundation material.
A backing layer is added to cover these stitches and give the jewelry a clean, finished appearance. It also protects the thread from abrasion during wear.
Common backing materials include:
- Ultrasuede
- Leather
- Microsuede
- Felt
The backing can be glued or stitched in place before finishing the edges.
To complete the piece, a beaded edge stitch is worked around the outer edge. This stitch passes through both the foundation and the backing layers while adding beads along the edge.
The most common finishing method uses a brick-stitch style edging, where the beads stack neatly along the edge to create a decorative border that frames the beadwork and securely joins the two layers.
Other edge finishing techniques are also possible. Some designs incorporate fringe, picot edges, or looped bead edging as decorative variations. These techniques can add movement or texture while still finishing and securing the beadwork.
Basic Bead Embroidery Stitches
Bead embroidery uses a small number of simple stitches to attach beads to the foundation. The important thing for beginners to know is that you only need to learn one stitch to start creating bead embroidery designs.
Many projects are made entirely with backstitch, while others may use only couching depending on the design and artist.
Backstitch
Backstitch is the most common and beginner-friendly bead embroidery stitch.
- Bring the needle up through the foundation.
- Pick up 2–4 beads (the number varies depending on the design intent)
- Stitch down through the foundation just beyond the last bead.
- Bring the needle back up through the foundation between the last two beads.
- Pass through the last bead to secure the row, then add the next group of beads.
Backstitch creates smooth lines of beads and is commonly used to outline cabochons, build decorative rows, and fill areas of beadwork.
Because it is simple and versatile, backstitch is usually the first stitch beginners learn for bead embroidery.
Couching
Couching is another technique used in bead embroidery to attach beads to the foundation. Instead of stitching beads down individually, a strand of beads is first strung onto a thread and laid on the surface of the design.
Small stitches are then used to tack the strand to the foundation by passing over the thread that holds the beads, usually between beads. The needle goes down through the foundation on one side of the strand and comes back up on the other side, anchoring the bead strand in place.
Because the beads are attached in a continuous strand, couching allows you to create long lines of beads quickly and can be useful for outlining shapes or covering larger areas of a design.
Couching is commonly used with:
- strands of seed beads
- larger beads
- decorative cords or fibers
This technique is useful when you want smooth curves or flowing lines that would take longer to build with individual stitches.
Stack Stitch
Stack stitch adds raised texture to bead embroidery. Instead of lying flat on the foundation, several beads are stacked vertically to form a small column.
The needle passes up through the foundation, several beads are added, and then a final bead is placed at the top as a stop bead. The needle passes back down through the stacked beads (but not the top bead), which causes the beads to stand upright.
Stack stitches are typically made with three to six beads and are used to create dimensional accents and textured surfaces within bead embroidery designs.
Edge Stitch (Brick Stitch Edge)
Edge stitch is used to finish bead embroidery after the beadwork is complete and the backing has been added. This stitch joins the foundation and backing layers while creating a decorative beaded border around the piece.
To work the stitch, the needle passes through both the front foundation and the backing layer near the edge of the beadwork. A bead is added and the thread loops around the edge so the bead sits neatly along the border.
Each stitch adds another bead, which stacks along the edge in a brick-like pattern, creating a clean and secure finish.
Edge stitch serves several purposes:
- joins the foundation and backing layers
- protects the edges of the beadwork
- creates a decorative border that frames the design
Because it seals the layers together while adding a polished border, this brick-stitch style edge finish is the most common method used to complete bead embroidery jewelry.
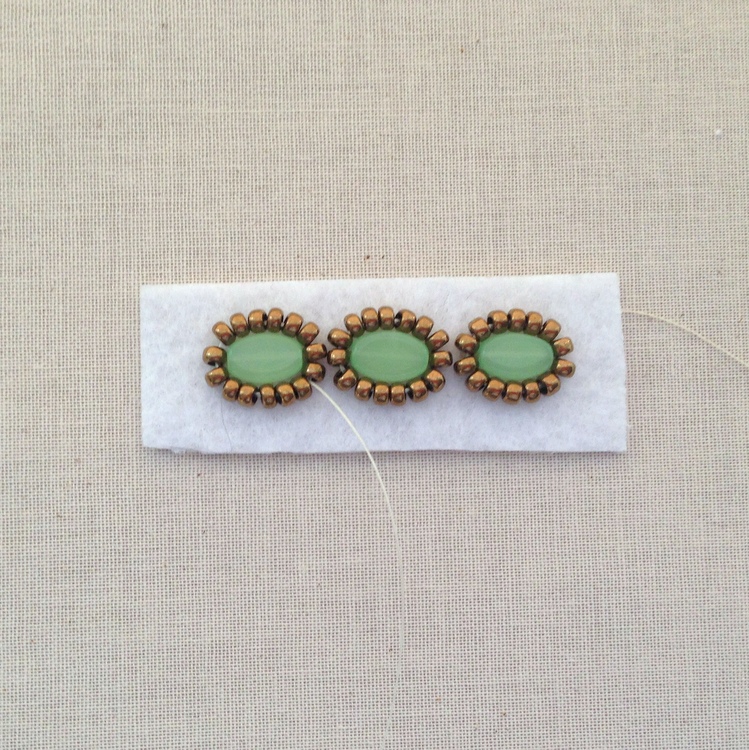
A First Bead Embroidery Project
Common Beginner Bead Embroidery Problems
Buckling Foundation
- Use firm foundation and avoid pulling thread too tightly.
- Make your stitches enter and exit next to the bead holes, so pulling the thread does not pucker the foundation
Uneven Bead Lines
- Work with consistent bead sizes and stitch through beads evenly.
- On cabochons, putting your thread throught the circle of beads a second time tightens the beadwork and aligns the beads.
Thread Tangles
- Use shorter thread lengths to stitch
- Condition nylon threads, use pre-waxed nylon thread or try FireLine
Cutting Too Close
- Leave a narrow margin before adding backing to prevent exposed thread.
Frequently Asked Questions About Bead Embroidery
What thread is best for bead embroidery?
Nylon threads like Nymo or KO are flexible and beginner friendly but can tangle. FireLine is stronger, and may be easier for beginners to get straight even lines. Choose a thread size appropriate for the size of beads you are working with.
Can I use fishing line beading thread?
Yes, braided fishing line such as FireLine works well. Avoid monofilament. It degrades over time.
Do I need special fabric?
A firm beading foundation gives the best results. Regular fabric is too soft to provide even or lasting results.
Is bead embroidery good for beginners?
Yes. The stitch techniques are simple, and designs can be as basic or elaborate as you choose.
Expanding Your Bead Embroidery Skills
Once comfortable with the basic stitches, you can explore:
- Multi-layered designs
- Fringe additions
- Mixed media components
- Sculptural bead embroidery
Bead embroidery offers creative freedom. Structure comes from the foundation, while design possibilities are nearly unlimited.
Comments
Post a Comment