Add the perfect finishing touch to your circular brick stitch beadwork with simple picots, fringes, and other edging techniques.
 |
| Make your brick stitch edges fancy with these options. |
This article focuses on adding decorative beaded edges to round brick stitch medallions, but the same techniques can be used with other shapes and beadwork atitches.
In this tutorial, you’ll learn how to add four easy edge finishes:
- Single Bead Edge
- Petal Edge
- 3-Bead Picot Edge
- Fringe Edge
Where Are Decorative Edges Used in Beadwork?
Decorative edging techniques are commonly used:
- Along the edges of bead embroidery
- Around brick stitch medallions
- At the ends of beaded fringe
- In netting or lacy beadwork designs at the point edges
- To decorate the edges of square stitch or loom beadwork
Materials and Tools
- Your circular brick stitch medallion (or other bead project) with working thread attached
- Size 8, 11 or 15 seed beads (depending on desired delicacy)
- Beading thread (like Nymo, KO, or FireLine)
- Beading needle, size 12 or what ever size you prefer that fits with your beads
- Optional: accent beads (drops, crystals, etc.) for fringe or petals
Bead Edging Techniques
Single Bead Embellished Edge
 |
| A single bead edge is added during the last row of brick stitch making it quick and easy! |
A clean, minimal edge that adds definition to your project.
How to Add a Single Bead Decorative Edge
The single bead edge is incorporated into the final round of brick stitch, so you’ll add it as you complete your last row.
Step 1: Start the Round of Brick Stitch
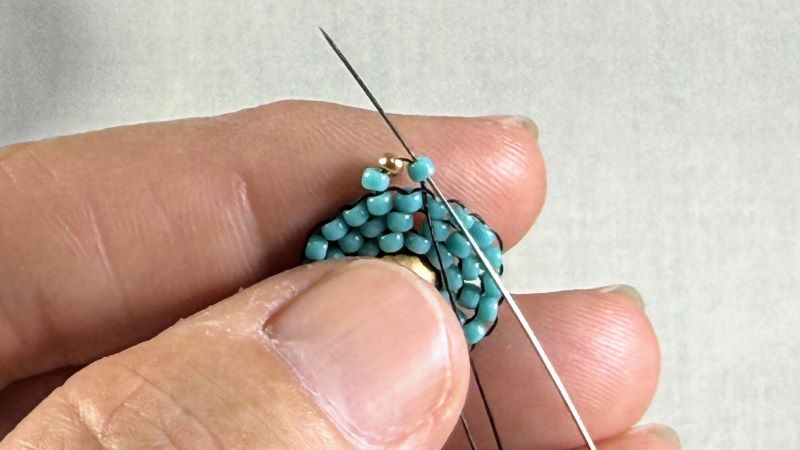 |
| For the first stitch, pick up a bead for the round, an edge bead and another bead for the brick stitch round |
For the first stitch, instead of picking up two beads for the brick stitch round, you’ll pick up three beads:
-
One bead in the main color for the round
-
One edge bead (this will stick out as decoration)
-
One more bead in the main color
The edge bead is sandwiched between the two main beads. Pass your needle under the next thread bridge and stitch up through the last bead added as you normally would to begin the brick stitch row.
Step 2: Continue the Round of Brick Stitch with the extra edge bead
 |
| For each additional stitch, add an edge bead and a bead for the brick stitch round |
For each following stitch in the round:
-
Pick up one edge bead and one main round bead.
-
Stitch under the next thread bridge and up the second bead as usual.
-
Make sure the edge bead is positioned sideways and centered between the two brick stitch beads so it forms a small point on the outer edge.
Tip: Watch Your Tension and Spacing
Keep your thread tension snug so the edge beads sit evenly above the surrounding beads. If your tension is too loose, the edge can look uneven or floppy.
Tip: Try Different Bead Sizes
This decorative edge is a great place to experiment with accent beads—try using smaller or larger beads, or even crystals, to add sparkle and interest to your project.
Petal Bead Edge
 |
| Two color variations of the petal decorative bead edge add a playful floral accent to circular brick stitch pendants. |
A floral-inspired embellishment made by adding loops of beads around raised edge beads to resemble flower petals. This edge builds on the single bead edge and creates a soft, flowery finish.
How to Add a Petal Decorative Bead Edge
The petal edge builds on the single bead edge technique, but adds more embellishment for a scalloped, flower-like finish.
Step 1. Add edge beads (see above) to every other brick stitch
As you stitch the final round of brick stitch, add an edge bead to every other brick stitch instead of every one. This spacing leaves room to make a loop of beads over the edge bead.
Step 2: Add loop of beads for petal
 |
| Add beads to surround the single edge bead by stitching up and down the prior brick stitch row |
After finishing the single bead edge round, go back and add a loop of beads around each raised edge bead. These loops create the petal-like effect that gives the edge its floral appearance.
With your thread coming up out of the final brick stitch round, pick up 4 or 5 beads and stitch down into the next brick stitch on the edge. Stitch back up the next brick stitch.Continue in this manner until you have surrounded all edge beads with a loop of beads.
Tip: Adjust Petal Loop Size to Fit Your Beads
The number of beads in each petal loop may vary depending on the size and shape of your beads. Try a few different counts to see what curves nicely around the edge bead without being too tight or too floppy.
Tip: Use Gaps for a Bail or Loop
If your petal edge pattern leaves a gap without an edge bead, that space is perfect for adding a loop to hang your medallion or turn it into a pendant.
3 Bead Picot Edge
 |
| The 3 bead picot is added directly to the final round of brick stitch. |
In beadwork, a picot is a small decorative loop—typically made with three beads—added along the edge or surface of a design. When the thread is pulled snug, the beads form a small triangular point that adds texture and detail.
How to Add a 3 Bead Picot Edge
The 3 bead picot edge is worked directly into the final round of your brick stitch medallion to add a pointed edge detail.
Step 1: Pick up 3 beads

After completing your final brick stitch round, pick up 3 beads. Stitch down through the next brick stitch bead to anchor the beads.
Step 2: Repeat the pattern
Stitch up through the following brick stitch bead, pick up 3 beads, and stitch down through the next one. Repeat this pattern around the entire edge of the medallion.
Using slightly smaller beads for the picot—such as size 15/0 instead of 11/0—creates a finer, more delicate edge that adds subtle detail without overwhelming your design.
Fringe Edge
 |
| Spiky fringe bead edge provides texture and movement on a brick stitch pendant |
How to Add a Fringe Edge
Step 1: Pick Up Fringe Beads
After finishing the final round of brick stitch, pick up a group of beads for your fringe and slide them down to your beadwork. Skip the last bead, then pass your needle back up through the remaining fringe beads and down through the next brick stitch bead to anchor the strand. You may need to hold the skipped bead and gently pull the thread to help the fringe align neatly.
Step 2: Repeat the Pattern
Stitch up through the following brick stitch bead, pick up the beads for the next fringe, skip the last bead and stitch back up through the rest of the fringe and stitch down through the next brick stitch. Continue this pattern around the entire edge.Tip: Customize Your Fringe
Try adding fringe only to the lower half of your piece for a modern earring style—or alternate long and short fringe around the entire edge for extra texture.
Final Thoughts on Decorative Bead Edges
Decorative edges are a simple but effective way to add personality, texture, and movement to your beadwork. These techniques are just the beginning—there are so many ways to finish your pieces with style. Do you have a favorite edge technique I didn’t mention or a favorite way to use one of these decorative edges? I’d love to hear about it in the comments!
I’d love to see how you use them in your own projects! Share your creations or ask questions in the Lisa Yang Jewelry Facebook group, follow along on Instagram, or sign up for my newsletter to get new tutorials and project ideas sent straight to your inbox.
Comments
Post a Comment