As I was making my own clay amulets from the polymer clay molds I made, I couldn't help but wonder if I was an amulet maker in a former life.

I was having entirely too much fun. And look at this pile of goodies! All Lisa Yang originals. Here are some of the details on how I made them.

I used a variety of polymer clay colors for my amulets. All are mixes that I made myself. This is a light peach color with some brown and red added. I typically mix it together, roll it to a fat snake and twist the snake to get a striated lined pattern in the clay - then smoosh it some more.

Most of the time, it was difficult to see the amulet pattern without adding some form of highlighting. Sometimes I used acrylic paint that I wiped off the highlights. Then I discovered I had Pearl EX Powder Pigments in lots of metal colors. They add glitter and highlights!
That's when things got totally out of control.

Here's a black/brown polymer clay mix with silver highlights painted on after baking. I like the rustic look mixed with the metallic.

And a browner color clay with an antique gold pearl ex powder brushed on - again after baking but while it's still warm.
Eventually, I started going full glitz and adding a gloss sealer over it. I mean - why not? I tried as many different finishing techniques as I could think of.

I was really enjoying the variety of finishes and looks I could achieve. So many options!

I think my favorite technique is when I started painting the mold with the Pearl Ex powders. First impressions would come out heavily gilded - almost like foil leaf, but subsequent impressions would be more unpredictable. I really like the way it fills crevices or highlight certain parts of the finished amulet.

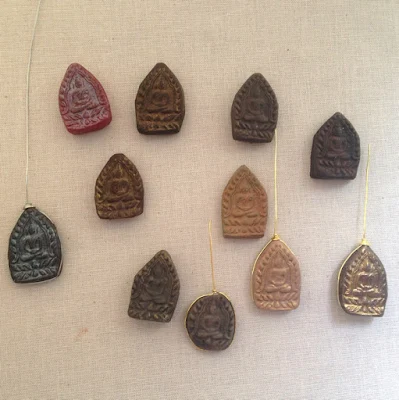
You can see some of the different ways I tried wire wrapping the amulets to make pendants. I didn't want to make them into beads - since I thought that took away from their authenticity as amulets.
Before baking, I typically added a small channel or indentation to the edges of each amulet, just under the decorative face. It's not very deep - just deep enough to hold a wire. Then I put wire in the channel and make them into a pendant bail on the top or top and bottom like the red one in the upper left.
By the way, if you like treasure hunts, in all of the pictures with multiple amulets of the same type, the original one is in the group too. See if you can pick it out.
Now to make some jewelry!
If you'd like to know when I publish new tutorials, videos or projects, please visit my Sign Up page for information on how to subscribe to emails or follow my social media accounts.

I was having entirely too much fun. And look at this pile of goodies! All Lisa Yang originals. Here are some of the details on how I made them.

I used a variety of polymer clay colors for my amulets. All are mixes that I made myself. This is a light peach color with some brown and red added. I typically mix it together, roll it to a fat snake and twist the snake to get a striated lined pattern in the clay - then smoosh it some more.

Most of the time, it was difficult to see the amulet pattern without adding some form of highlighting. Sometimes I used acrylic paint that I wiped off the highlights. Then I discovered I had Pearl EX Powder Pigments in lots of metal colors. They add glitter and highlights!
That's when things got totally out of control.

Here's a black/brown polymer clay mix with silver highlights painted on after baking. I like the rustic look mixed with the metallic.

And a browner color clay with an antique gold pearl ex powder brushed on - again after baking but while it's still warm.

Eventually, I started going full glitz and adding a gloss sealer over it. I mean - why not? I tried as many different finishing techniques as I could think of.

I was really enjoying the variety of finishes and looks I could achieve. So many options!

I think my favorite technique is when I started painting the mold with the Pearl Ex powders. First impressions would come out heavily gilded - almost like foil leaf, but subsequent impressions would be more unpredictable. I really like the way it fills crevices or highlight certain parts of the finished amulet.

You can see some of the different ways I tried wire wrapping the amulets to make pendants. I didn't want to make them into beads - since I thought that took away from their authenticity as amulets.
Before baking, I typically added a small channel or indentation to the edges of each amulet, just under the decorative face. It's not very deep - just deep enough to hold a wire. Then I put wire in the channel and make them into a pendant bail on the top or top and bottom like the red one in the upper left.
Now to make some jewelry!
If you'd like to know when I publish new tutorials, videos or projects, please visit my Sign Up page for information on how to subscribe to emails or follow my social media accounts.
Comments
Post a Comment