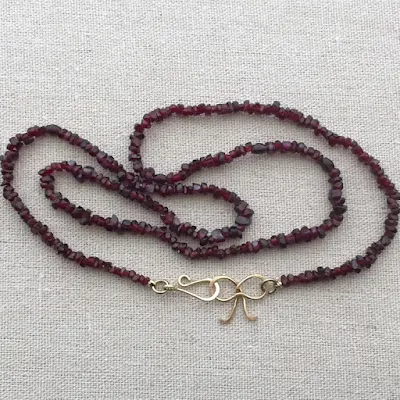
This project started out as a custom order for bridesmaid's gifts - a simple wire gift bow necklace. The tutorial for the gift bow charm is at the link.
Making this type of a wire hook is super easy - especially with wire looping step pliers. They are forever one of my favorite tools to make earwires (the 7mm size barrel) and wire clasps (the 5mm or 7mm barrel). In this case, I am using 18g red brass wire for the hook. I had a scrap piece lying around - but I guess about 2 - 2.5 inches is about right.
By liking my page on Facebook: Lisa Yang Jewelry on Facebook
As usual, I ended up with a few extra bows after the necklaces were delivered - and I'm getting super tired of the extra projects laying around. I really wanted to find another way to use the wire bows. After brainstorming a bit, I decided they would make sweet hook and eye clasps.
And even better, I had a necklace that is just crying out for a better clasp!
This is the necklace. It is a long strand of garnet chips that my Mom gave me for mother's day. It's really pretty, but the clasp was just killing it for me.
It's a barrel screw clasp - and probably a little better than most of this type. It's brass and connected to the necklace by bead tip cups.
Everything else about the necklace is good - no wear on the stringing wire, but barrel clasps are not a favorite of mine because they can easily come undone. And there's nothing particularly pretty about this clasp.
Definitely a good re-do project. Here's the after picture. Isn't it soooo much better? Pretty!!
I made a hook to go with one of the extra wire bows and connected it to the bead tip using a 5mm gold colored jump ring.
Making this type of a wire hook is super easy - especially with wire looping step pliers. They are forever one of my favorite tools to make earwires (the 7mm size barrel) and wire clasps (the 5mm or 7mm barrel). In this case, I am using 18g red brass wire for the hook. I had a scrap piece lying around - but I guess about 2 - 2.5 inches is about right.
I looped it around the smallest barrel to make the main hook and used my round nose pliers to make the connecting loop and the extra loop where the clasp closes. I hammered the curves and loops to work harden them.
Of course, I already had the bow, but you can make one of those using the link I posted above. Make sure you bend the wire ends at the bottom of the bow up and file them smooth so they can't scratch you. I attached the bow the same way - using a 5mm jump ring.
What I really like most about the clasp - well, there's a couple of things.
First, it's much more secure than a barrel clasp.
Second, it looks good no matter whether it's in the front, back or side of the necklace.
And last, even though I thought it might be a little too cute (you know - overly sweet, too young for me, cute) it isn't at all! It just adds a great finishing touch!
And just for reference, here's one of the bows as a charm on a simple chain. This is 20g wire, lightly hammered.
And this is the same bow that I used for my clasp - I decided I didn't like it as a bracelet as much as I did in the clasp.
Can you come up with any other ways to use the bow charms? I still have a few more spares to use up, just waiting for inspiration to strike. Let me know in the comments!
Follow me, please!
By email: You can sign up by providing your email and you will be notified of new blog posts plus special offers. Make sure you confirm your subscription request by clicking the link in the email.
By following me on Pinterest: Lisa Yang Jewelry on Pinterest
By subscribing on YouTube: Lisa Yang Jewelry on YouTube
And Instagram: @lisayangjewelry


nice post
ReplyDelete