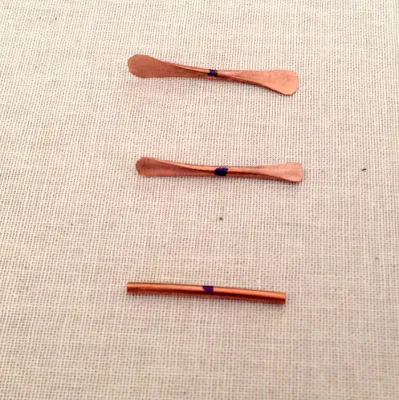
Hammered pieces of wire can be combined to make lots of wonderful jewelry projects. This article will show you how to make hammered wire sticks that incorporate a twist into the design - which makes more interesting jewelry designs.
In this previous article on making hammered wire sticks, I made one into a ring shank. Since then, I have scoured the internet for more inspiration on how to make and use them. I made a board called Hammered Wire Sticks/Bone Jewelry that you can look at.
This article will show you how to make twisted wire bones that are perfect to make into a necklace chain.
I also found a few additional free tutorials (listed at the end of this post) where you can learn more about making wire bones jewelry.
The project I decided to try is a necklace chain that uses hammered wire links. Sharilyn Miller has a free Bone Links Chain Tutorial that I used as inspiration - although our methods and tools vary a little.
For this chain, the materials used are 14 gauge copper wire that is cut into 18 pieces just under 1 inch long.
I marked the center of each piece with sharpie to make it easy to know what point I should hammer up to.
After some trial and error, I found what I think is the quickest and easiest way to make each link. First, I hammer with a ball pein hammer, to flatten the wire from the middle to the end.
Then, I hammer each wire link a second time using a chasing hammer to flare out the end and flatten the overall shape.
It felt like it took forever to get the sticks hammered. I timed it though - and it was less than 3 minutes per link once I got the process down.
I did that until my fingers were black (and blue).
This is a pile of freshly hammered twisted wire bone links.
I used pliers style hole punch which give a variety of sizes and are very easy to use to punch metal.
Then it was time for a tumble. I use a rotary tumbler filled with mixed stainless steel shot. I also fill the tumbler halfway with water and drop of dish washing soap such as Dawn. The dish soap helps remove any oils and helps with the polishing action of the tumbling.
When you use the hole punch for metal, it leaves a little nub on the back of the hole. I tried to cheat and not sand the little nubs from punching the holes. I wanted to see if tumbling would smooth them out enough. It doesn't. I ended up tumbling, filing with a metal file, and then tumbling again.
But after all that work, aren't they pretty?
That's as far as I got today. I've started assembling the chain, but haven't finalized how I want to link them. So many options!
So, until tomorrow, I'll leave you with a couple of more free tutorials that use hammered wire sticks.
Free hammered wire bail tutorial from Daisy Chain Designs Jewellery Blog
Hammered Wire Dangle Earrings Tutorial from My Girlish Whims
Curved Hammered Wire Dangle Earrings Tutorial from Jewelry Making Journal


Comments
Once you get the basic jewelry tools - I highly suggest a rotary tumbler from Harbor Freight. On sale and with a 20% off coupon that you can find in their flyers, they are under $35.00 and worth every penny!!
Thank you
Electricians recycle lots of uncoated shiny wire. Here it's folded loosely in bunches and is sold by the pound.
You only get the usual electrical gauges, but much of it works, and I can draw some down if I really have to. If not, I go to the hardware store or Rio Grande.
Post a Comment