From the time I first saw colorful Huichol style beadwork, I have been itching to give it a try. This week, I finally did - and I was not disappointed in the least. I think I may be sticking with this for a few more weeks.


Hopefully, in a future blog post, I can correct all those mistakes I made by not adding loops or weaving in jump rings to hang these by. I also plan to try a few more shapes and some less traditional color combinations.
My friend suggested these large flowers would make a great choker - so that's another item on the 'things to make' list.
To find out about my latest posts, please subscribe one of these ways:
By liking my page on Facebook: Lisa Yang Jewelry on Facebook

Huichol beadwork is made using netting stitch. These flowers are all circular netting. Like many other stitches, netting has multiple forms of the stitch - tubular netting, flat horizontal netting, flat vertical netting and circular netting. What you may not realize is that one of the most popular beadwork stitches is a type of netting stitch. Can you guess which one?
It's peyote stitch! Most netting stitches pick up several beads and skip several beads for each stitch. Peyote is much more regular in that it picks up the same number of beads that it skips and/or stitches into.
Anyhow, back to these fabulous flowers. This month's tutorial at The Spruce is a roundup of Huichol tutorials. While making that list, I decided to make a tutorial for the little daisy flower and introduce a variation on it to make the stars.
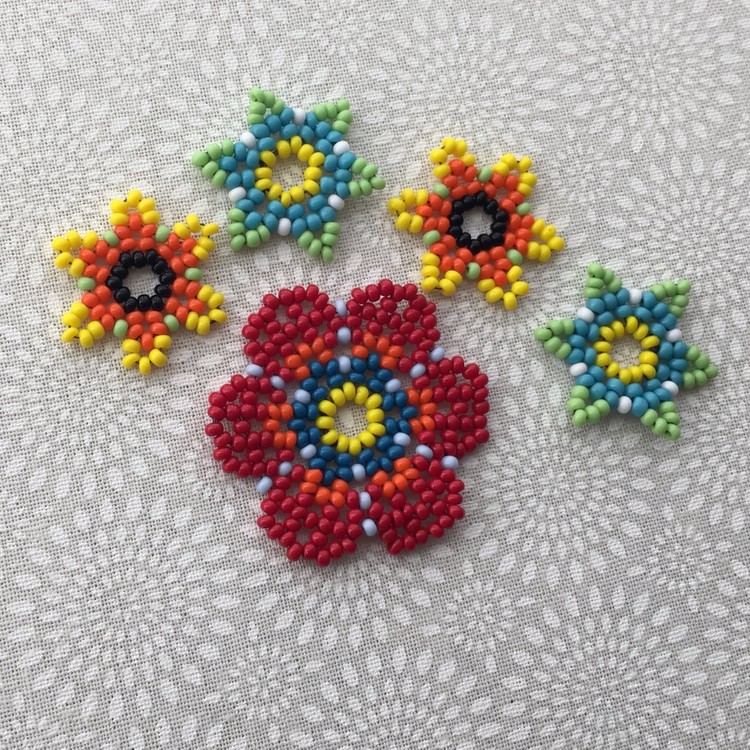
Honestly, one of the best parts about these flowers is how easy they are to make. And as a bonus, they don't require a lot of materials.
By the way - do you notice these great little clear bead holders? Another one of my recent finds for storing beads. These are 5 gram cosmetic pots for lip gloss, etc. I use them for Czech seed beads that are sold by the hank, so when I cut a strand or two, I put all the beads in one of these pots. I also have the 10 gram plastic pots for slightly larger beads.

Size 11 Czech beads work best - but any round bead that is somewhat uniform will work. I'll bet the inexpensive chinese seed beads could be used if you were willing to cull them to get similar size and shapes. Miyuki seed beads could also work - but not cylinder beads. The seed beads need to have rounded edges in order to curve into the flower shapes. For a more traditional look, use brightly colored opaque beads.
I recommend using 10 lb FireLine for the flowers if you have it. A thicker thread helps make the flowers stiff and less floppy. If you only have thinner thread, you may need to reinforce the shape by going back over the thread path.
You will need four colors of seed beads to make the daisy or stars.

Start with an arm's length of thread. Pick up 12 beads with a size 11 needle. Put your needle back through the beads and pull the beads into a circle. Go into the first bead a second time and pull the circle closed.

Pick up five beads of a different color. Skip one black bead and insert your needle into the next bead. I like to bead clockwise - but you can go in either direction. Adjust accordingly...

After you pull through the thread, there will be a half loop on the outside of the circle.

Repeat the same steps. Pick up five more beads, skip one bead on the circle, and put your needle into the next bead. Pull tight.

Continue until you have beaded all the way around the circle. On the last stich, you will go through the last bead on the circle, and will also go through the first two beads you added on this round. This is a step-up to get in position to start the next round.
The first row of netting is complete and you are in position to start the next round.

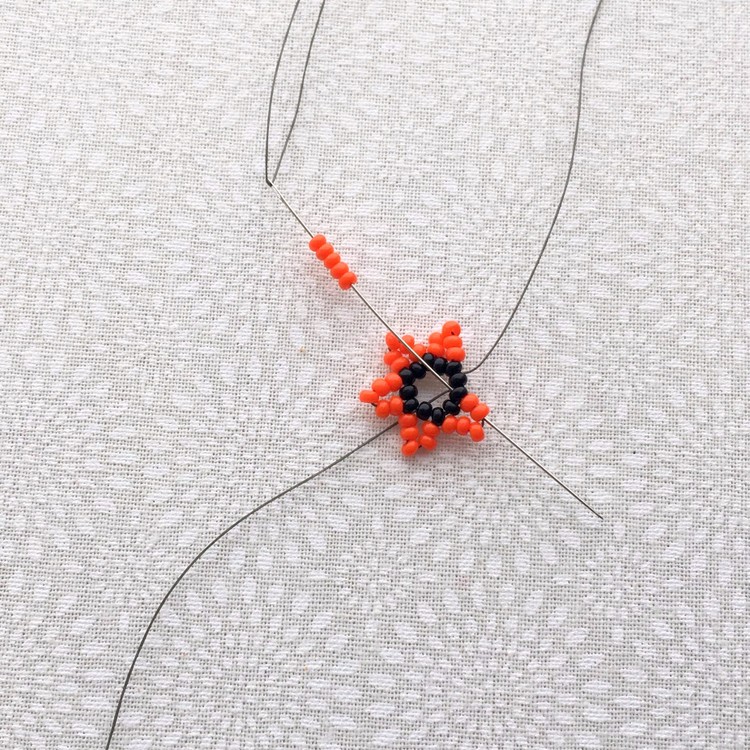
Pick up five beads of the next color. Skip the next bead and put your needle into the second bead you added in the previous round. The picture below actually combines two steps - but the first part is adding the five yellow beads and stitching into the second orange bead.
Next, pick up one bead of another color (lt. green). Stitch into the second bead on the next petal. You will repeat this pattern all the way around.

Pick up five more beads for the next petal, skip one bead, and then put your needle into the next bead.

Pull tight. Next pick up a single color bead, skip one bead in the next petal, and then go through the second bead.

Etc, etc. until you have completed this round, alternating between adding a petal loop or an individual bead. And that's it!! Weave in and tie off your thread ends - and the basic daisy flower is complete!

But what about the stars? They are the exact same pattern. When I finished the flowers, the edges seemed like they could use a little reinforcing. When I stitched back through, I skipped the center bead of the five that I added for each petal.
Hopefully, that makes sense. Instead of going through all five light green beads in the petal below, I went though the first two beads, skipped the third bead and went down the next two beads. That makes the petal go to a sharp point to make a star.

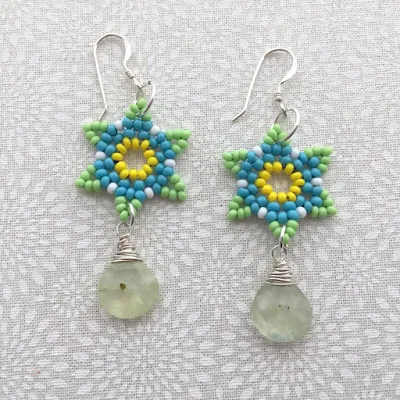
Now what to do with these fabulous little flowery baubles?! Earrings were obvious choices, so I decided to make a bracelet.
I used the Chinese knotting cord to make a macrame band and connected the flower using colored jump rings.

If I have any regrets in making these flowers, it's that I didn't consider adding loops or jump rings for hanging them before I tied off the thread ends or completed the rows. I'm sure I could have done a much better job if I thought about how I would be using these flowers in advance.
The lack of planning is more evident in these earrings. (Remember - you are always your own worst critic).
I had to use large jump rings to attach the stars to earring findings because nothing else would fit. Oh yeah - and I also had to turn the loops on the earwires to face the other way. Minor adjustments that most people would never know about - but they could have been avoided with a little advance planning.
I had recently wrapped these little prehnite drops and when I realized the colors coordinated, I figured they were meant to be together. I've decided to keep these earrings for myself.

A few more rounds of beaded netting result in these larger flowers. This is one of several additional free Huichol beadwork tutorials that you can find in my article at the The Spruce crafts.

My friend suggested these large flowers would make a great choker - so that's another item on the 'things to make' list.
To find out about my latest posts, please subscribe one of these ways:
By email: You can sign up by providing your email and you will be notified of new blog posts plus special offers. Make sure you confirm your subscription request by clicking the link in the email.
By following me on Pinterest: Lisa Yang Jewelry on Pinterest
By subscribing on YouTube: Lisa Yang Jewelry on YouTube
And Instagram: @lisayangjewelry
Comments
kfreddss@yahoo.com
Post a Comment