One thing I love to explore is taking a relatively simple design and seeing how many variations I can come up with. Like these U shaped wire beading frames for example.

I started with the design for this necklace. There is a free tutorial to make the U shaped wire frame and another tutorial to add the beads to the frame. I knew when I made the necklace that this same design would look great as earrings.

With this as the starting point, I made several more of the beading frames at once by wrapping 20g red brass wire around my handy dandy round Beadsmith plastic step mandrels.

I cut the loops apart using flush cutters - and ended up with a bunch of round wire hoops, all the same size and shape. These were wrapped around step 4 on the plastic mandrel, but resized to step 3 before they were cut. The finished rings from step 3 are almost exactly 1 inch in diameter on the outside of the wire. Step 3 on the mandrel produces rings that 7/8 inch in diameter.
For anyone not familiar with making rings or hoops like this, the wire will spring back a little, so if you wrap around step 4 (see picture of the mandrel with my numbering above), any wire but very soft wire will get larger when you remove pressure.
That's one of the reasons I loooove these mandrels. I can wrap around one step smaller than I want and then reshape the frame around the next larger size - at least with round and oval shapes.

So, now for a few new designs using the wire rings. I couldn't help but make a simple hoop first. These will be embellished with beads in the future.

By turning simple loops aligned with the frame, you get a slightly different shape and look than what I started with on the horseshoe beaded pendant.

The gap is just the right size to add a jump ring - which again makes for a nice simple frame for adding beads - either dangles or wrapped to the frame.

At this point, this isn't really a new design, since I used these same frames to make the tutorial for these bead embellished hoops. I plan to change up the way I use the frames in the future though.

Moving on to truly new designs are these earrings where I flipped the frame and connected it with beads. I seriously had my doubts that the beads would be heavy enough to keep the hoops centered on the earwires without flipping over - but it works! I think I prefer the smaller size hoop in this design.

And once that design worked, I went for a little variation by adding a gemstone chain connecting the sides of the hoop frame. There's a tutorial for making wire wrapped bead chain here. It only takes a few links and in this case, I like the way the chain completes the round circle of the hoop.
I love these earrings - and I was totally keeping them for myself - except I lost one. Grrr. It's not like I can't make more - but it's still frustrating. Probably a lot less frustrating than it is for people who can't make a new one though.
I should mention that 20g wire is suitable for these frames but needs to be hardened to maintain the shape well. You can do that by hammering the wire frame or by putting them in a tumbler. I tumble finished earrings with stainless steel shot for about an hour and they maintain their shape perfectly. It also helps polish them up. You can't use the tumbler if you have soft gemstones like opals or pearls. It can scratch them.
By liking my page on Facebook: Lisa Yang Jewelry on Facebook
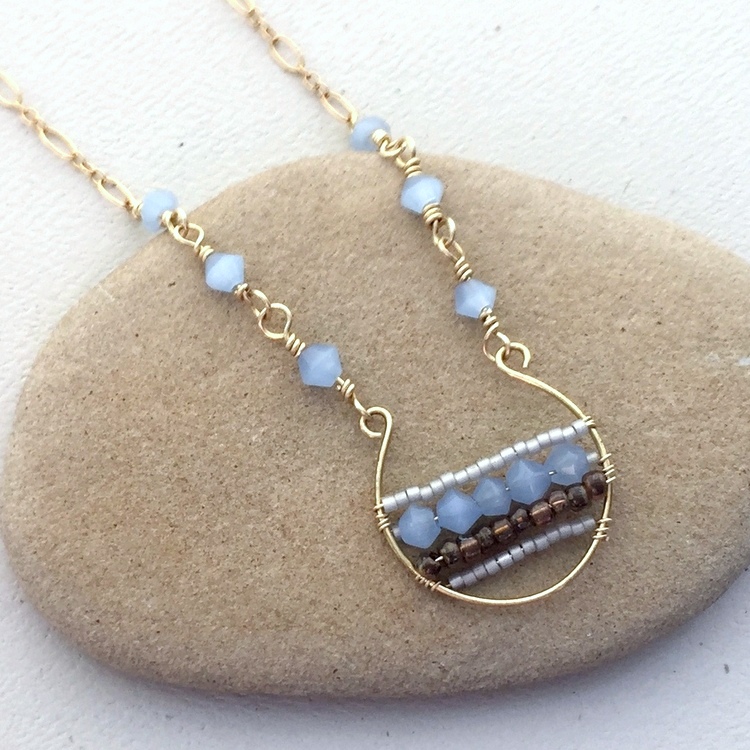
I started with the design for this necklace. There is a free tutorial to make the U shaped wire frame and another tutorial to add the beads to the frame. I knew when I made the necklace that this same design would look great as earrings.

With this as the starting point, I made several more of the beading frames at once by wrapping 20g red brass wire around my handy dandy round Beadsmith plastic step mandrels.

I cut the loops apart using flush cutters - and ended up with a bunch of round wire hoops, all the same size and shape. These were wrapped around step 4 on the plastic mandrel, but resized to step 3 before they were cut. The finished rings from step 3 are almost exactly 1 inch in diameter on the outside of the wire. Step 3 on the mandrel produces rings that 7/8 inch in diameter.
For anyone not familiar with making rings or hoops like this, the wire will spring back a little, so if you wrap around step 4 (see picture of the mandrel with my numbering above), any wire but very soft wire will get larger when you remove pressure.
That's one of the reasons I loooove these mandrels. I can wrap around one step smaller than I want and then reshape the frame around the next larger size - at least with round and oval shapes.


By turning simple loops aligned with the frame, you get a slightly different shape and look than what I started with on the horseshoe beaded pendant.

The gap is just the right size to add a jump ring - which again makes for a nice simple frame for adding beads - either dangles or wrapped to the frame.

At this point, this isn't really a new design, since I used these same frames to make the tutorial for these bead embellished hoops. I plan to change up the way I use the frames in the future though.

Moving on to truly new designs are these earrings where I flipped the frame and connected it with beads. I seriously had my doubts that the beads would be heavy enough to keep the hoops centered on the earwires without flipping over - but it works! I think I prefer the smaller size hoop in this design.

And once that design worked, I went for a little variation by adding a gemstone chain connecting the sides of the hoop frame. There's a tutorial for making wire wrapped bead chain here. It only takes a few links and in this case, I like the way the chain completes the round circle of the hoop.
I love these earrings - and I was totally keeping them for myself - except I lost one. Grrr. It's not like I can't make more - but it's still frustrating. Probably a lot less frustrating than it is for people who can't make a new one though.
I should mention that 20g wire is suitable for these frames but needs to be hardened to maintain the shape well. You can do that by hammering the wire frame or by putting them in a tumbler. I tumble finished earrings with stainless steel shot for about an hour and they maintain their shape perfectly. It also helps polish them up. You can't use the tumbler if you have soft gemstones like opals or pearls. It can scratch them.
By email: You can sign up by providing your email and you will be notified of new blog posts plus special offers. Make sure you confirm your subscription request by clicking the link in the email.
By following me on Pinterest: Lisa Yang Jewelry on Pinterest
By subscribing on YouTube: Lisa Yang Jewelry on YouTube
And Instagram: @lisayangjewelry
Comments
Post a Comment