I have about a bazillion projects going on at once right now, but that's no excuse for not writing about them - is it? I'll start with the last couple of weeks and try to catch up to date over the weekend.

First, I got slightly hooked on tubular herringbone stitch for a little bit. I've always loved the look of the stitch, but honestly had never tried it. I don't know why, but I thought tubular herringbone would be difficult - but it isn't... at all.
Probably one of the easier stitches actually, although it takes a lot of time. Anytime you are making a dense rope chain, that seems to be the case. I updated the tubular herringbone stitch tutorial, so check it out if you'd like to give it a try.
A few things that I probably didn't mention in the tutorial,but learned from trial and error.

You start tubular herringbone with a ladder stitch base. In my opinion, it was easier to start with a two row ladder stitch base rather than a single row - and I think it looked prettier too.
The top one used a two row ladder start and the bottom a single ladder stitch. I guess the single ladder stitch blends better, but it was really hard to hold onto for the first several rows. That one extra row made a big difference in getting things started.

One other observation, while you can use almost any type of beads for tubular herringbone, I really liked the round 11/0 Czech beads. They resulted in a braid that was really supple and smooth. I think they may have been more forgiving of mistakes - or I just improved a lot from my first bracelet to the second. (yes - that could be the reason!). I think 8/0 round beads may be even better since they will stitch up much more quickly!

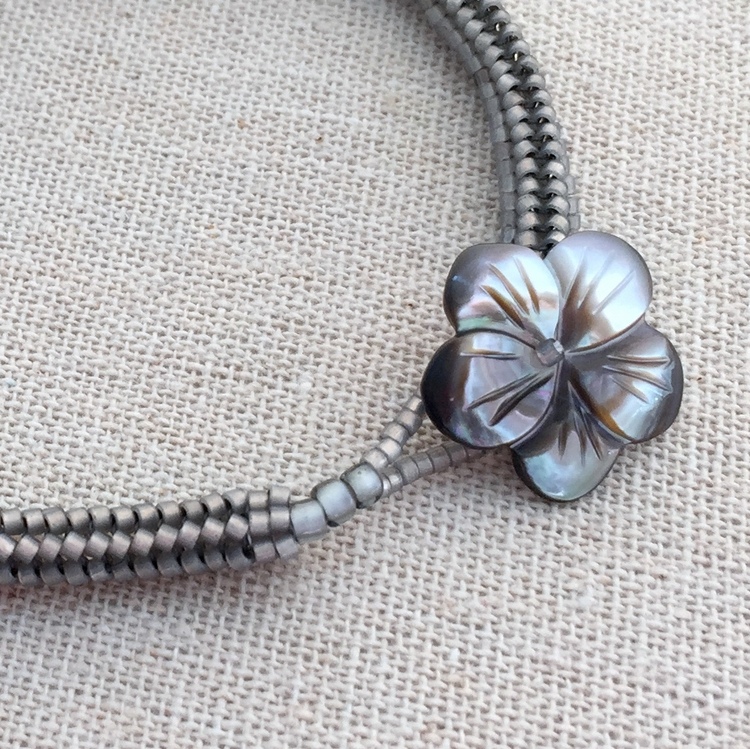
This is my first tubular herringbone stitch bracelet. It's honestly a little drab in person, although the carved shell button definitely helped set it off. Before I found that, it was headed for the UFO (Unfinished Objects) bin.

Which is another important observation. I was not at all enamoured with the tri-color bracelet above while I was making it either. It wasn't until I added the button clasp (which the color theme was designed around) that I decided it was not just ok - but really pretty cool.
I like that it looks a little different from each side and it fits my wrist perfectly. So my suggestion, in general, with herringbone stitch is to just keep going until your project is totally done.

Of course, now I'm going to add that you still may not love it at the end... This is a four column tubular herringbone bracelet. I used 11/0 Czech beads, a bead soup on hand that just happened to match the same type of glass bead that I loved in the prior bracelet.
Fundamentally, the bracelet is ok, but with only four columns instead of six, the bracelet loses the stiffness that gives it shape and ends up floppy. And the colors - eh... It just doesn't do it for me. Oh well, two out of three isn't bad!

A quick note about using button closures on beadwork too. It's something else that I don't do frequently and it's worth learning how to do right (yup, that's the link to the updated tutorial).
I love the chevron and millefiori glass beads that I use for the closure so much that I've been hoarding them forever trying to figure out how to use them. They're not the least bit expensive... and the same applies to the carved shell beads. Both are usually on sale for around a $1 (so if you click the link and they're much more than that - check back another time!) The bottom line, this is finally a great way to use them.
I might as well drop in one more miscellaneous item here and get it off my backlog.

When I made my butterfly fetish necklace that I used the squaw wrap closure on, I didn't bother finishing the coral and turquoise one because I wasn't happy with how it looked.

I did a minor re-work on it to add spacer beads between the tube beads and remove the central butterfly pendant. I think there's a slight improvement, but it still isn't right with me. I'm going to let it sit a little while longer - but I'm open to suggestions. I'm actually thinking the butterflies need more space to breath - but I'll still let it sit a while. I'm also thinking multi-strand may be the way to go. We shall see...
Until next time, I hope you'll check me out on social media to get updates on my latest posts.
By liking my page on Facebook: Lisa Yang Jewelry on Facebook
First, I got slightly hooked on tubular herringbone stitch for a little bit. I've always loved the look of the stitch, but honestly had never tried it. I don't know why, but I thought tubular herringbone would be difficult - but it isn't... at all.
Probably one of the easier stitches actually, although it takes a lot of time. Anytime you are making a dense rope chain, that seems to be the case. I updated the tubular herringbone stitch tutorial, so check it out if you'd like to give it a try.
A few things that I probably didn't mention in the tutorial,but learned from trial and error.

You start tubular herringbone with a ladder stitch base. In my opinion, it was easier to start with a two row ladder stitch base rather than a single row - and I think it looked prettier too.
The top one used a two row ladder start and the bottom a single ladder stitch. I guess the single ladder stitch blends better, but it was really hard to hold onto for the first several rows. That one extra row made a big difference in getting things started.

One other observation, while you can use almost any type of beads for tubular herringbone, I really liked the round 11/0 Czech beads. They resulted in a braid that was really supple and smooth. I think they may have been more forgiving of mistakes - or I just improved a lot from my first bracelet to the second. (yes - that could be the reason!). I think 8/0 round beads may be even better since they will stitch up much more quickly!

This is my first tubular herringbone stitch bracelet. It's honestly a little drab in person, although the carved shell button definitely helped set it off. Before I found that, it was headed for the UFO (Unfinished Objects) bin.

Which is another important observation. I was not at all enamoured with the tri-color bracelet above while I was making it either. It wasn't until I added the button clasp (which the color theme was designed around) that I decided it was not just ok - but really pretty cool.
I like that it looks a little different from each side and it fits my wrist perfectly. So my suggestion, in general, with herringbone stitch is to just keep going until your project is totally done.

Of course, now I'm going to add that you still may not love it at the end... This is a four column tubular herringbone bracelet. I used 11/0 Czech beads, a bead soup on hand that just happened to match the same type of glass bead that I loved in the prior bracelet.
Fundamentally, the bracelet is ok, but with only four columns instead of six, the bracelet loses the stiffness that gives it shape and ends up floppy. And the colors - eh... It just doesn't do it for me. Oh well, two out of three isn't bad!

A quick note about using button closures on beadwork too. It's something else that I don't do frequently and it's worth learning how to do right (yup, that's the link to the updated tutorial).
I love the chevron and millefiori glass beads that I use for the closure so much that I've been hoarding them forever trying to figure out how to use them. They're not the least bit expensive... and the same applies to the carved shell beads. Both are usually on sale for around a $1 (so if you click the link and they're much more than that - check back another time!) The bottom line, this is finally a great way to use them.
I might as well drop in one more miscellaneous item here and get it off my backlog.

When I made my butterfly fetish necklace that I used the squaw wrap closure on, I didn't bother finishing the coral and turquoise one because I wasn't happy with how it looked.
I did a minor re-work on it to add spacer beads between the tube beads and remove the central butterfly pendant. I think there's a slight improvement, but it still isn't right with me. I'm going to let it sit a little while longer - but I'm open to suggestions. I'm actually thinking the butterflies need more space to breath - but I'll still let it sit a while. I'm also thinking multi-strand may be the way to go. We shall see...
Until next time, I hope you'll check me out on social media to get updates on my latest posts.
By email: You can sign up by providing your email and you will be notified of new blog posts plus special offers. Make sure you confirm your subscription request by clicking the link in the email.
By following me on Pinterest: Lisa Yang Jewelry on Pinterest
By subscribing on YouTube: Lisa Yang Jewelry on YouTube
And Instagram: @lisayangjewelry
Comments
Post a Comment