For about 2 weeks now, I have had three beading looms warped and ready to go. And there they sat. Waiting.
Waiting...
Finally inspiration hit and I made bracelets using two of the three looms - the Ricks loom and the Mirrix loom.

Any idea which bracelet is made with which loom? Well, if you are familiar with the Ricks loom, the answer is probably obvious. It is one of the primary differences and benefits of the Ricks loom - not having to deal with a selvage.

It is more likely to be this bracelet because of the finish on the ends.
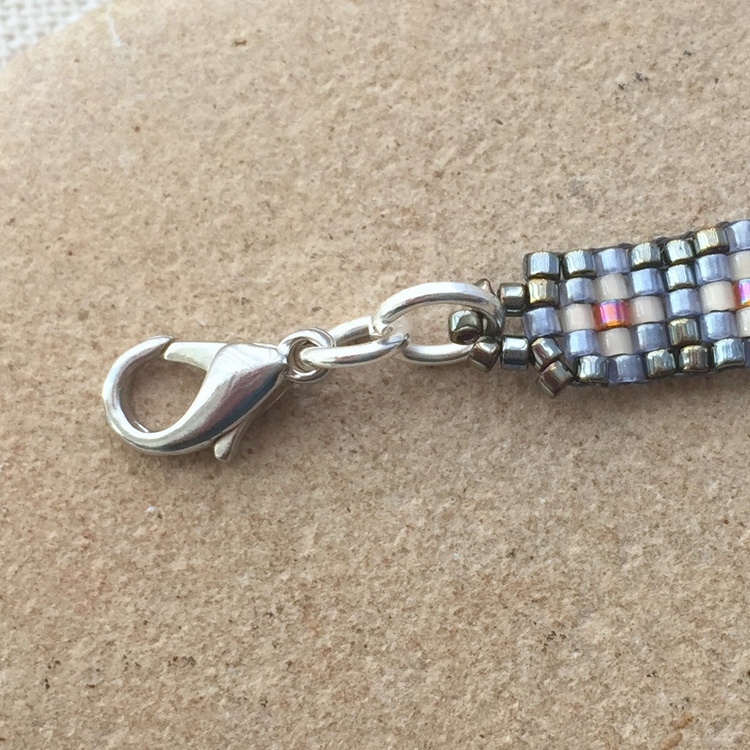
The main benefit to using a Ricks loom is that there are only two warp threads to weave in when you are done with your project. The other bracelet has a selvage edge and ribbon clamp finish, which is usually done on a traditional style loom instead of weaving in the warp ends.
When I wrote about the other bracelet made on a Mirrix loom, the article is called salvaging the selvage because ugh!, I almost ruined it doing (or undoing) the selvage.
The Ricks loom bracelet was extremely simple to make because it is a well designed and ergonomic loom. The loom has a slanted design that angles your project slightly and lessens the strain on your back looking down on the bead work (sorry - no picture of that - so trust me).
The Ricks Loom is adjustable by sliding the tail stock, which is made of sturdy wood, and it comes with a single set of spare parts such as the warp bars and pegs that hold the thread (although some people would argue that a pair of spares would be more effective). These mechanisms are simple and easy to understand - although there is a slight learning curve to using a Ricks loom.
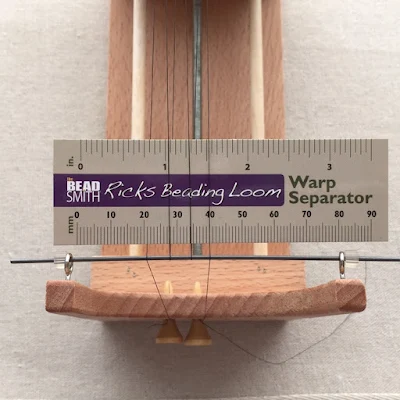
The Ricks loom is even easier to warp than most bead looms because there are no warp coils (springs) or thread separators to worry about. The thread is wrapped around a thin but sturdy bar and the spacing is adjusted when you add the first row of beads. There is also a warp separator card that it used in the beginning to
For this project, I used 6 lb smoke colored FireLine thread for the warps. One drawback I found is that I had to cut the thread off the spool before threading the warp on a Ricks Loom. The way the warp rods are set up, you can't fit the spool of FireLine around them. If you use a smaller spool of thread, those will fit around the warp coil.

Here is my full setup. I have my beads in a nifty new beading tray that I picked up at a bead show in January, and my warped loom with a warp separator card, which you only need for the first two rows and replaces the warp coil on other looms. The warp separator keeps the threads separated so it is easy to tell which is the first thread, second etc.
A quick note about cutting the warp thread off the spool. Of course, I cut off a piece of thread too short for the job. Boogers! I hate to waste thread (or beads, or time...). Of course, I'll save that piece of FireLine as if it was a precious piece of spun gold.
Anyway, to calculate the amount of thread you'll need for a Ricks loom, take the number of warps (6) and multiple it by the length of your design (in my case 6 inches) and add the length for each of the tail threads (in my case 8 inches per tail thread which is 16 inches total). That leaves me needing to pull about 52 inches of FireLine thread (6x6 = 36 inches for the warps, plus 16 for the tails).
Too much math!
Since most beaders never really measure anything and do it by arm's lengths, I just measured what a full arm's length is for me. It's just over 60 inches - so that's perfect.
A full arm's length is from fingers holding thread on one hand to the fingers holding thread on the other hand while they are outstretched from your sides. Sometimes I think everyone knows this, but I hate when people assume things, so better to explain. Of course, your wing span will vary by your height. (I'm on the tall side).

This diamond pattern done with Bead Tool 4.0. You don't really need bead software - graph paper works great. But bead Tool does allow you to use the software for free with some limitations, such as can't save and print your patterns, palettes and layouts. If that works for you, download it and try it out. Once you start trying it, it's hard to give up. It's so much fun to play with the colors and make patterns. It's better than making zentangles to me.
The part that actually took time to get started on this project was for me to go get the beads out of my stash. (Finding beads always takes a long time!)

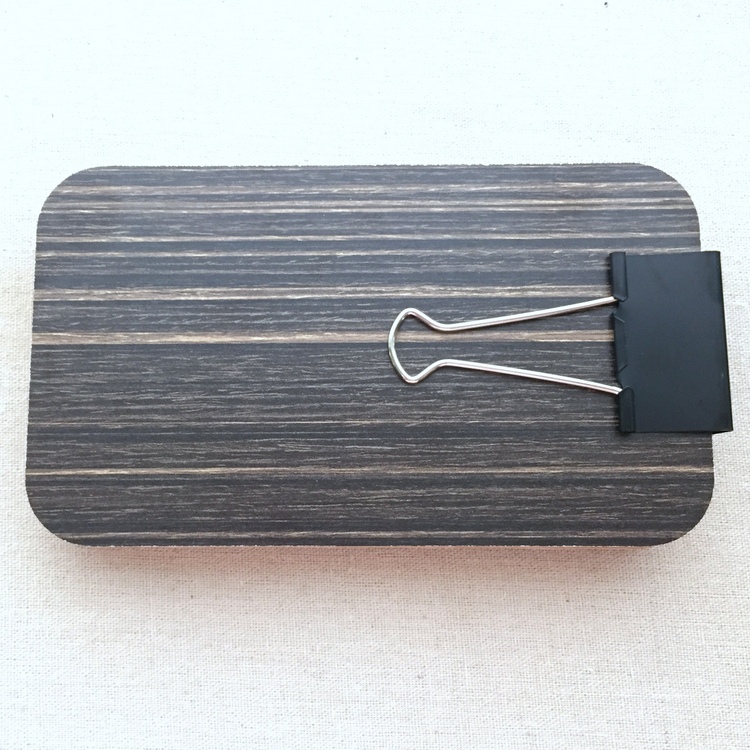
Once I did, I put them in my new bead container - they are lining the right side of the bead board. This nifty little container is meant for holding seed beads and is called a traveling bead board. They're in the middle of the page at the link.

It comes with a lid that you can put on and take all your organized beady goodness with you. The lid uses two clips, even though I have it closed with only one.
The little rounded sections make it easy to scoop the beads out with your needle - once you get the hang of it and stop stabbing the wall. Honestly. When you do stab the wall, the beads go flying everywhere - so you try to get the hang of it pretty quickly.
But I was talking about looming - right?

The first two rows of the Ricks loom are done above the warp separator card, then you remove it and slide them down to the warp bar. This give you an idea of the difference with a Ricks loom - there's no warp thread ends for the middle rows, just the two on the side.

From this point, you just loom like normal until you get to the other end - and can't squeeze in any more beads. For me, there is no warp threads at all on this end, but I suppose that will vary depending on how many rows of beads your project has.
Here's another big difference with the Ricks loom - you need to know the size your project will be before you start when you warp the threads and set up the loom. Your project is going to be that length. No adjusting once you've started. There are some ways to add length
So, this is where most people would remove the bracelet from the loom and adjust the rows of beads by pushing them up or down to cover that extra little bit of space left from the warp bars.
I didn't do that.
I decided there was just enough space here for me to fit in one more row - by adding it after the bracelet was off the loom. It wasn't the easiest row to add, but I was right, and it fit. The downside was that it took me 20 minutes to add those five beads, so you have to wonder if it was worth it! On the next bracelet I made, I didn't bother adding the extra row and adjusted the space between the beads to cover the gap - it worked perfectly and was much quicker.
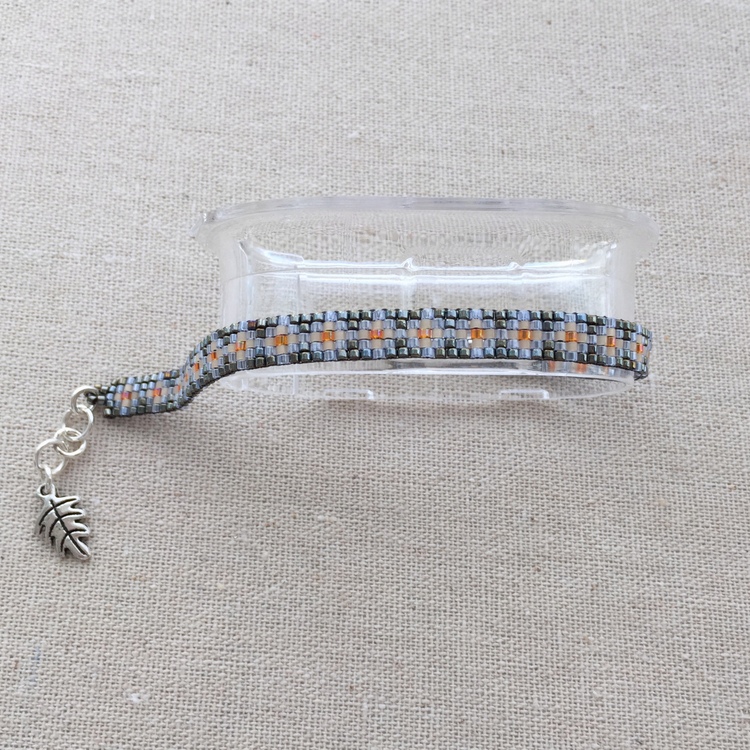
Finishing the bracelet was super easy and quick - I just added small bead loops and wove in the two warps and weft thread ends. If your project was too short, you could always add extra rows using square stitch at this point. So - better too short than too long when using the Ricks loom, in my opinion.

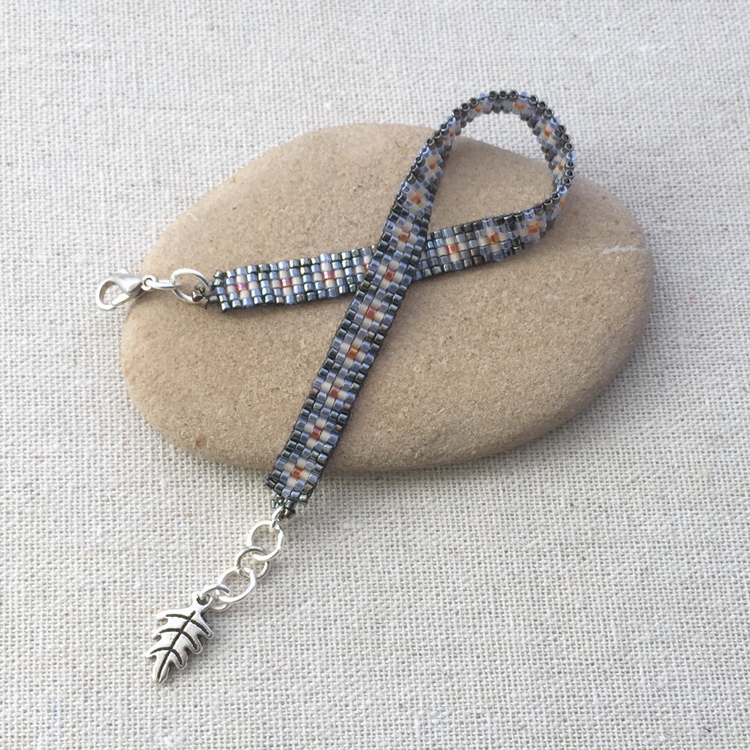
I would add more pictures of the bracelet, but it's hard to photograph. The beads I chose give off too much reflection, so the pictures don't show the colors or pattern well. Another lesson learned, I guess. It looks good on though.

I've started another bracelet on the Ricks loom, same pattern, same size, different colors - and with Czech beads instead of Delica tube beads. They are larger and sit a little differently. You can see the difference in this article Comparing a Delica and Czech Bead Loomed Bracelet.

The mixed bead bracelet is inspired by Adonnah Langer's (Chili Rose) beautiful work. I love, love, love this loomed bracelet. I had the best time making it since it reminded me of the game Tetris. You are always deciding what size blocks fit best in which gaps. It looks fabulous on, so I almost cried when I closed the ribbon end on the selvage and it unraveled when I was finishing it. You can read the story of how I repaired the selvage and saved this loomed bracelet.
The travel bead board that I love - I bought that. I wish they would send me a few for free (just putting it out there), but they probably won't so I'll buy a large one the next time I see them at a bead show.
To keep up with my posts, Facebook, Instagram or subscribing to this blog by email are the best options. If you share jewelry making related information on social media, I will follow back. You can find links using the Get Social button at the top of the page or look in the side bar next to this post.
Waiting...
Finally inspiration hit and I made bracelets using two of the three looms - the Ricks loom and the Mirrix loom.
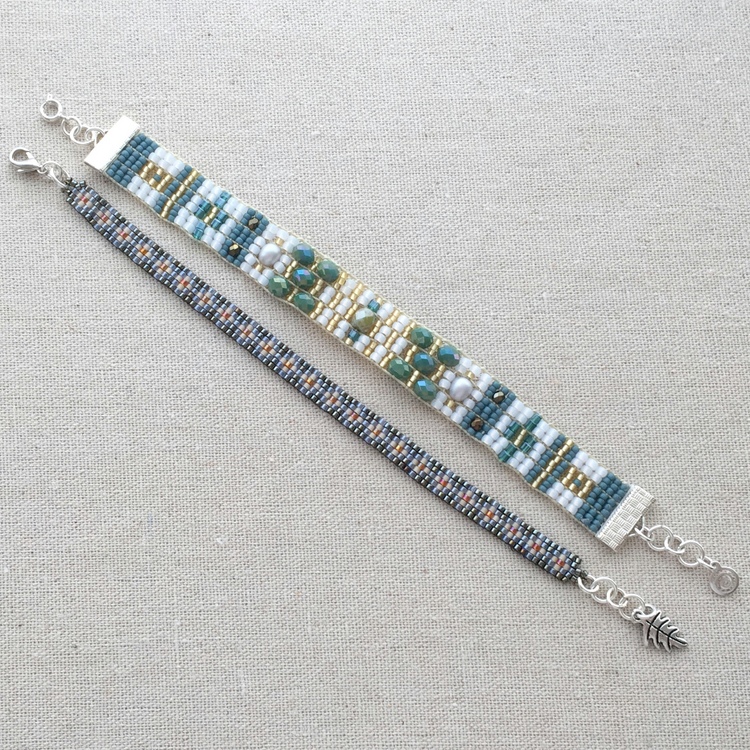
Any idea which bracelet is made with which loom? Well, if you are familiar with the Ricks loom, the answer is probably obvious. It is one of the primary differences and benefits of the Ricks loom - not having to deal with a selvage.
It is more likely to be this bracelet because of the finish on the ends.
If you're not familiar with looming terminology, the selvage edge is where the warp threads are secured. For fabric, the selvage edges are typically the top and bottom edges as the fabric comes off the bolt. Creating a selvage is one method of dealing with the warp threads. Another way is to weave them into your project.
The main benefit to using a Ricks loom is that there are only two warp threads to weave in when you are done with your project. The other bracelet has a selvage edge and ribbon clamp finish, which is usually done on a traditional style loom instead of weaving in the warp ends.
When I wrote about the other bracelet made on a Mirrix loom, the article is called salvaging the selvage because ugh!, I almost ruined it doing (or undoing) the selvage.

The Ricks loom bracelet was extremely simple to make because it is a well designed and ergonomic loom. The loom has a slanted design that angles your project slightly and lessens the strain on your back looking down on the bead work (sorry - no picture of that - so trust me).
The Ricks Loom is adjustable by sliding the tail stock, which is made of sturdy wood, and it comes with a single set of spare parts such as the warp bars and pegs that hold the thread (although some people would argue that a pair of spares would be more effective). These mechanisms are simple and easy to understand - although there is a slight learning curve to using a Ricks loom.
How to Warp a Ricks Loom
I think warping is pretty easy on all of the looms I've used so far. Typically, you just wrap the warp thread around one bar across and around the other until you have one more warp than beads in a row in your design. For this jewelry project, I am making a loom beaded bracelet with 5 beads per row, so I need six warp threads.
The Ricks loom is even easier to warp than most bead looms because there are no warp coils (springs) or thread separators to worry about. The thread is wrapped around a thin but sturdy bar and the spacing is adjusted when you add the first row of beads. There is also a warp separator card that it used in the beginning to
For this project, I used 6 lb smoke colored FireLine thread for the warps. One drawback I found is that I had to cut the thread off the spool before threading the warp on a Ricks Loom. The way the warp rods are set up, you can't fit the spool of FireLine around them. If you use a smaller spool of thread, those will fit around the warp coil.

Here is my full setup. I have my beads in a nifty new beading tray that I picked up at a bead show in January, and my warped loom with a warp separator card, which you only need for the first two rows and replaces the warp coil on other looms. The warp separator keeps the threads separated so it is easy to tell which is the first thread, second etc.
A quick note about cutting the warp thread off the spool. Of course, I cut off a piece of thread too short for the job. Boogers! I hate to waste thread (or beads, or time...). Of course, I'll save that piece of FireLine as if it was a precious piece of spun gold.
Anyway, to calculate the amount of thread you'll need for a Ricks loom, take the number of warps (6) and multiple it by the length of your design (in my case 6 inches) and add the length for each of the tail threads (in my case 8 inches per tail thread which is 16 inches total). That leaves me needing to pull about 52 inches of FireLine thread (6x6 = 36 inches for the warps, plus 16 for the tails).
Too much math!
Since most beaders never really measure anything and do it by arm's lengths, I just measured what a full arm's length is for me. It's just over 60 inches - so that's perfect.
A full arm's length is from fingers holding thread on one hand to the fingers holding thread on the other hand while they are outstretched from your sides. Sometimes I think everyone knows this, but I hate when people assume things, so better to explain. Of course, your wing span will vary by your height. (I'm on the tall side).
Diamond Loom Pattern Design
Here is my bracelet loom pattern that I designed in advance.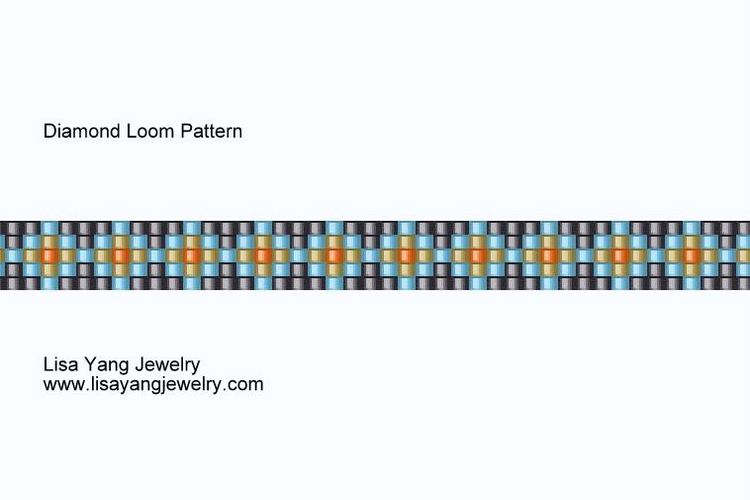
This diamond pattern done with Bead Tool 4.0. You don't really need bead software - graph paper works great. But bead Tool does allow you to use the software for free with some limitations, such as can't save and print your patterns, palettes and layouts. If that works for you, download it and try it out. Once you start trying it, it's hard to give up. It's so much fun to play with the colors and make patterns. It's better than making zentangles to me.
The part that actually took time to get started on this project was for me to go get the beads out of my stash. (Finding beads always takes a long time!)

Once I did, I put them in my new bead container - they are lining the right side of the bead board. This nifty little container is meant for holding seed beads and is called a traveling bead board. They're in the middle of the page at the link.
It comes with a lid that you can put on and take all your organized beady goodness with you. The lid uses two clips, even though I have it closed with only one.
The little rounded sections make it easy to scoop the beads out with your needle - once you get the hang of it and stop stabbing the wall. Honestly. When you do stab the wall, the beads go flying everywhere - so you try to get the hang of it pretty quickly.
But I was talking about looming - right?

The first two rows of the Ricks loom are done above the warp separator card, then you remove it and slide them down to the warp bar. This give you an idea of the difference with a Ricks loom - there's no warp thread ends for the middle rows, just the two on the side.

From this point, you just loom like normal until you get to the other end - and can't squeeze in any more beads. For me, there is no warp threads at all on this end, but I suppose that will vary depending on how many rows of beads your project has.
Here's another big difference with the Ricks loom - you need to know the size your project will be before you start when you warp the threads and set up the loom. Your project is going to be that length. No adjusting once you've started. There are some ways to add length
So, this is where most people would remove the bracelet from the loom and adjust the rows of beads by pushing them up or down to cover that extra little bit of space left from the warp bars.
I didn't do that.
I decided there was just enough space here for me to fit in one more row - by adding it after the bracelet was off the loom. It wasn't the easiest row to add, but I was right, and it fit. The downside was that it took me 20 minutes to add those five beads, so you have to wonder if it was worth it! On the next bracelet I made, I didn't bother adding the extra row and adjusted the space between the beads to cover the gap - it worked perfectly and was much quicker.
Finishing the bracelet was super easy and quick - I just added small bead loops and wove in the two warps and weft thread ends. If your project was too short, you could always add extra rows using square stitch at this point. So - better too short than too long when using the Ricks loom, in my opinion.
I would add more pictures of the bracelet, but it's hard to photograph. The beads I chose give off too much reflection, so the pictures don't show the colors or pattern well. Another lesson learned, I guess. It looks good on though.
I've started another bracelet on the Ricks loom, same pattern, same size, different colors - and with Czech beads instead of Delica tube beads. They are larger and sit a little differently. You can see the difference in this article Comparing a Delica and Czech Bead Loomed Bracelet.

The mixed bead bracelet is inspired by Adonnah Langer's (Chili Rose) beautiful work. I love, love, love this loomed bracelet. I had the best time making it since it reminded me of the game Tetris. You are always deciding what size blocks fit best in which gaps. It looks fabulous on, so I almost cried when I closed the ribbon end on the selvage and it unraveled when I was finishing it. You can read the story of how I repaired the selvage and saved this loomed bracelet.
More Info You Should Know
A couple of more things you should know - my Ricks loom (and a little Ricky loom) were provided free by the manufacturer. It doesn't influence my writing about the loom though. I love it and I also enjoy the Facebook page The Ricks Loomatiks.The travel bead board that I love - I bought that. I wish they would send me a few for free (just putting it out there), but they probably won't so I'll buy a large one the next time I see them at a bead show.
To keep up with my posts, Facebook, Instagram or subscribing to this blog by email are the best options. If you share jewelry making related information on social media, I will follow back. You can find links using the Get Social button at the top of the page or look in the side bar next to this post.
Comments
So glad I found your site. I ran across something you made online and have been trying to find out where it is in a tutorial of some kind.
Here's the page:
https://www.thespruce.com/introduction-to-stitches-techniques-beading-340089
Its the lovely piece at the top." Pick up five beads and stitch into the middle bead you just added. "
Advice or link to where I can learn this technique? Its so pretty.
Thank you so much!
Post a Comment