Make A Wish Bracelet!
I finally have some time to catch up on my blog!
And happily, I've also been really busy making jewelry for the past couple of months, so I have a lot of projects to write about.
First up is these wonderful Make A Wish bracelets.
First up is these wonderful Make A Wish bracelets.
I had a large custom order for these as party favors for a friend's daughter's Sweet 16 birthday party.
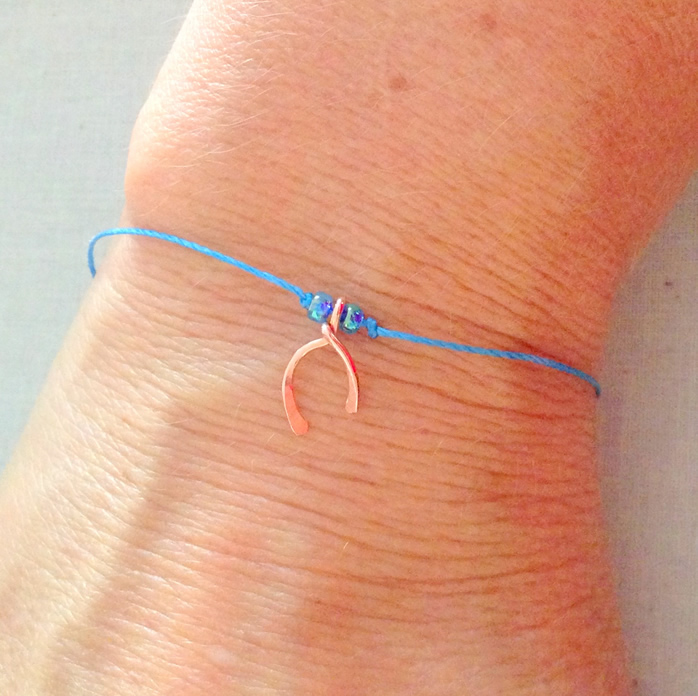
If you're not familiar with wish bracelets, they are simple string bracelets with beads or charms. When you knot them on your wrist, you make a wish. When the cord breaks, your wish will come true.
Since these bracelets are meant to eventually be lost, it makes sense that the charms and beads are not anything you would mind losing.
Handmade Wishbone Charms
What separates my bracelets from many others out there is that I choose to make handmade wire wishbone charms instead of buying charms and just stringing the bracelets.

I made wishbone charms in silver filled, copper and jeweler's brass gold colored wire.
The bracelet charms are 1/2 inch long, and while you can easily make them a bit larger, I found that you can't easily make them smaller. They just tend to lose the wishbone shape and become more like a horseshoe.
Wishbone Charm Instructions
Materials to make a 1/2 inch charm:
30 mm 20g wire for each charm (18g also works for a slightly larger charm)
Round Nose Pliers
Chain nose pliers
Oval Wubbers pliers
Jeweler's hammer and block

Cut one piece of wire for each charm. Finding pieces of wire from your scrap bin is ideal for this project.

Make a loop at the top of the wire using your round nose pliers. I make this loop using the end of my pliers so the loop is small.

Using your chain nose pliers to hold the loop, twist the loop 1/4 turn.

The basic shape and size of the charm is made, you just need to curve the sides to look more like a wishbone.

I found my Large Oval Wubbers pliers
worked perfectly for this! The smaller mandrel was the ideal size for my little wishbone charms.

I bent both sides of the wishbone around the pliers mandrel to make the shape quickly and easily. It could also be done with round nose pliers, but would take a little more fiddling.


I bent both sides of the wishbone around the pliers mandrel to make the shape quickly and easily. It could also be done with round nose pliers, but would take a little more fiddling.

I hammered the ends of the wishbone and turned them in slightly to finish the shape.

I used C-Lon Bead Cord to string my bracelets since it comes in so many beautiful colors.
One of the keys to these bracelets is the packaging, which needs to clearly explain how they are used. I will do a separate post on that, as well as instructions for some other charms that work great for these bracelets.
If you prefer to buy charms, these wishbone charms are really cute too!
Follow Lisa Yang Jewelry
I don't spam or sell your email, you just get notified of my new blog posts in your inbox or favorite social media site. Yay!

I used C-Lon Bead Cord to string my bracelets since it comes in so many beautiful colors.
One of the keys to these bracelets is the packaging, which needs to clearly explain how they are used. I will do a separate post on that, as well as instructions for some other charms that work great for these bracelets.
If you prefer to buy charms, these wishbone charms are really cute too!
One last wish
I would love it if you would sign up to get my free jewelry making blog posts by e-mail or follow me on social media to find out about new free projects.Follow Lisa Yang Jewelry
I don't spam or sell your email, you just get notified of my new blog posts in your inbox or favorite social media site. Yay!
Comments
Thanks for the post.
x
Post a Comment