This post is about how to make a hook and eye clasp. In particular, it's about making a hook and eye clasp with my new Lindstrom RX Plier and Cutter Set! That is my newest set of tools and I'm so excited to get started using them.
That means the projects are a little bit more focused on the pliers right now. Mostly, I would like to see for myself if the age old jewelry making wisdom of buying the best tools you can afford is true.
By liking my page on Facebook: Lisa Yang Jewelry on Facebook
That means the projects are a little bit more focused on the pliers right now. Mostly, I would like to see for myself if the age old jewelry making wisdom of buying the best tools you can afford is true.
So, here's the first project that I unleashed the new pliers on - making hooks for hook and eye clasps.

My personal opinion is that learning to make your own findings is one of the best things you can do - no matter what type of jewelry you make (i.e. stringing, bead weaving or wire wrapped). Especially if you have any plans to sell your jewelry.
- They are less expensive to make than buy - and often you can use scrap pieces of wire and left over beads - and they still look amazing
- You will never have to wait for an order or run to the store for findings to finish a piece of jewelry
- They are easy to make
- They will make your jewelry more interesting than the person at the craft fair next to you with all store bought findings
- You get to justify having the fancy tools you invested in
Don't get me wrong - I don't think you need to make all your findings, and I definitely use lots of store bought findings, but knowing how to make a few can really help in the long run.
Wire Working Tools
To get started, you'll need your brand new Lindstrom RX Plier and Cutter Set
:) and some 18g wire. Ok - you can use your round nose pliers and flush cutters no matter what brand they are. I'm still just giddy with excitement to try these!
You'll also need a mandrel to make the hook around. My preference is these economical Multi-step Looping Pliers, but if you want to go super economically, the smooth barrel of a pen will also work.
You'll also need a mandrel to make the hook around. My preference is these economical Multi-step Looping Pliers, but if you want to go super economically, the smooth barrel of a pen will also work.
Some optional tools are a hammer and bench block or a tumbler with stainless steel shot. It's nice to flatten the curve of the hook to work harden the metal which makes it stronger (and it looks nice), but as long as your wire is thick enough and the hook is not too large - it should be fine. The tumbler is another alternative to work harden the metal - without flattening and it - and the tumbler also polishes your newly created wire jewelry findings.
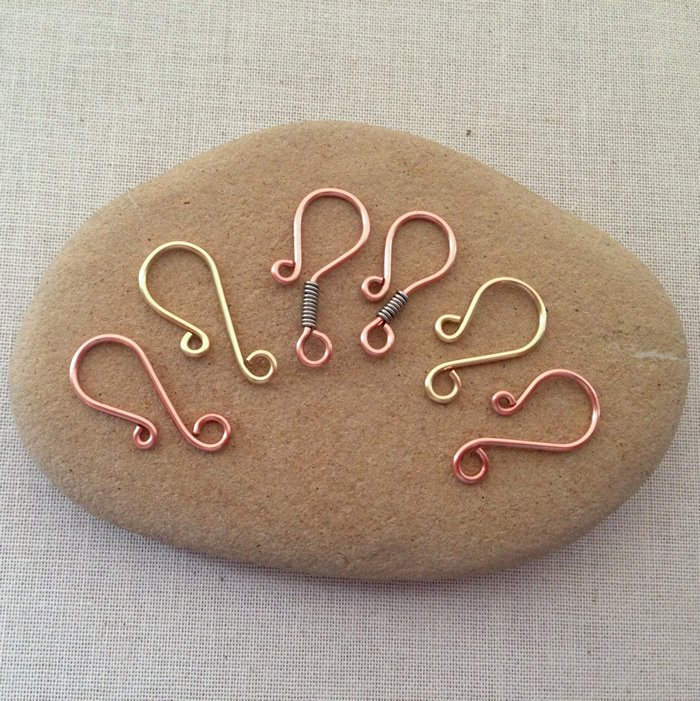
These instructions make a hook clasp that is about 3/4 inch long. For your information - the gold colored hooks in the demonstration pictures are made using my old tools, the copper hooks are made with my shiny, yummy, ergonomic, unfortunately rather expensive, new ones.

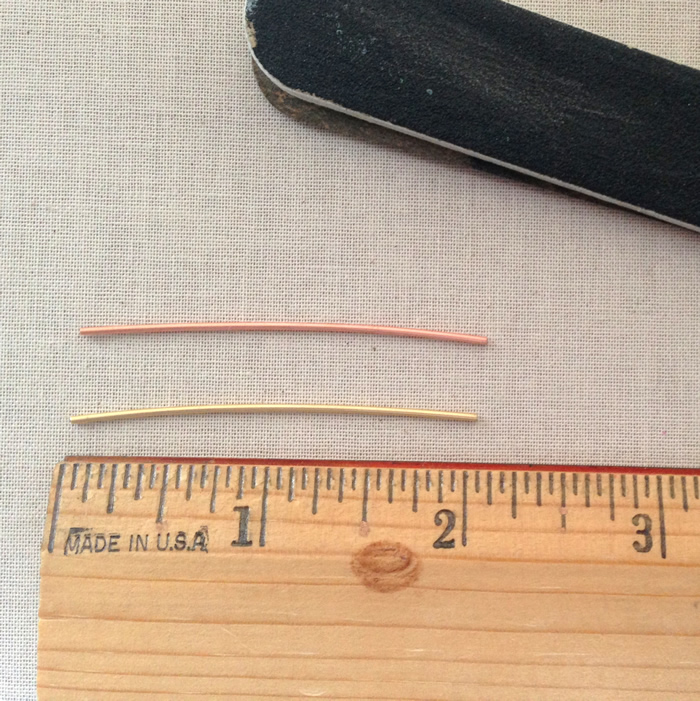
Cut a piece of 18g jewelry making wire about 2 inches in length. I use copper, brass, sterling, sterling filled or gold filled.
For those of you interested in the tool comparison, the Lindstrom flush cutters are very comfortable to use, and they make a nice flush cut that is comparable to the one my Xuron Flush Cutters make. The most notable difference is they make a very pleasant snap sound when they cut the wire.
I kid you not. It's fun to hear the snap but I think the cut from the Xuron cutters is equally flush. The Lindstrom tips are a little smaller than the Xuron cuters I have, so they'll fit into tighter spaces. The Lindstrom pliers also have a more comfortable grip and closure mechanism.
File the cut end of your wire smooth. An emory board with foam in the middle that is meant for acrylic nails works great. It just takes a few swipes to take the sharp ends off. You can also use a cup bur which is specifically made for rounding wire ends.

Using your round nose pliers, turn a small loop on the filed end. See the difference in the size of those loops? Copper is the Lindstrom's, brass is the other pliers. The smaller end of the Lindstrom pliers allows me to make a tighter toop.

To make the curve for the hook, wrap the wire around your step pliers or mandrel until the wrapped end and wire are in close contact.

If you started with 2 inches of wire, you should have just enough wire left to turn a loop on the other end. For me, that's about 3/8 inch. Note that this shape is pretty much like the earwires I make. Instead of turning a loop, I turn the end out slightly, trim and file the end smooth.

Back to making the hooks - there's really not much of a difference between the finished clasps, is there?
Where there is a difference is in the feel of the tools. The economy round nose pliers dig into the palm of my hand - something I never noticed before.
And they require more strength overall to handle - again, not something I have noticed because I don't have either hand strength or mobility issues. Now that I have something to compare it with - I have to admit the Lindstroms feel really nice.
Another area where the difference is really noticable is when making spirals and curves. The fine point of the Lindstrom's make it super easy to make a really tight spiral.

You can see it in a few of my little practice doodads and thingamabobs. I hammered some of the wire ends first and it was amazing how tight of a center I could get on the spirals. I really love that!
On the other hand, making larger loops - like the one at the bottom of the hook clasp, is a challenge since that is about as large as the pliers go.
And once you've made a few hooks, maybe you'd like to make this wire gift bow charm to use as the eye portion of a hook and eye clasp?? The gift bow makes a great pendant too.

Making a Hook Clasp
These instructions make a hook clasp that is about 3/4 inch long. For your information - the gold colored hooks in the demonstration pictures are made using my old tools, the copper hooks are made with my shiny, yummy, ergonomic, unfortunately rather expensive, new ones.
Cut a piece of 18g jewelry making wire about 2 inches in length. I use copper, brass, sterling, sterling filled or gold filled.
For those of you interested in the tool comparison, the Lindstrom flush cutters are very comfortable to use, and they make a nice flush cut that is comparable to the one my Xuron Flush Cutters make. The most notable difference is they make a very pleasant snap sound when they cut the wire.
I kid you not. It's fun to hear the snap but I think the cut from the Xuron cutters is equally flush. The Lindstrom tips are a little smaller than the Xuron cuters I have, so they'll fit into tighter spaces. The Lindstrom pliers also have a more comfortable grip and closure mechanism.
File the cut end of your wire smooth. An emory board with foam in the middle that is meant for acrylic nails works great. It just takes a few swipes to take the sharp ends off. You can also use a cup bur which is specifically made for rounding wire ends.

Using your round nose pliers, turn a small loop on the filed end. See the difference in the size of those loops? Copper is the Lindstrom's, brass is the other pliers. The smaller end of the Lindstrom pliers allows me to make a tighter toop.

To make the curve for the hook, wrap the wire around your step pliers or mandrel until the wrapped end and wire are in close contact.

If you started with 2 inches of wire, you should have just enough wire left to turn a loop on the other end. For me, that's about 3/8 inch. Note that this shape is pretty much like the earwires I make. Instead of turning a loop, I turn the end out slightly, trim and file the end smooth.

Back to making the hooks - there's really not much of a difference between the finished clasps, is there?
Where there is a difference is in the feel of the tools. The economy round nose pliers dig into the palm of my hand - something I never noticed before.
And they require more strength overall to handle - again, not something I have noticed because I don't have either hand strength or mobility issues. Now that I have something to compare it with - I have to admit the Lindstroms feel really nice.
Another area where the difference is really noticable is when making spirals and curves. The fine point of the Lindstrom's make it super easy to make a really tight spiral.

You can see it in a few of my little practice doodads and thingamabobs. I hammered some of the wire ends first and it was amazing how tight of a center I could get on the spirals. I really love that!
On the other hand, making larger loops - like the one at the bottom of the hook clasp, is a challenge since that is about as large as the pliers go.
And once you've made a few hooks, maybe you'd like to make this wire gift bow charm to use as the eye portion of a hook and eye clasp?? The gift bow makes a great pendant too.

More Jewelry Making News and Projects
If you would like to know when I buy new tools, how I'm using them or my other jewelry making related adventures, please sign up for one of these fabulous social media delivery services, so you'll know when there's something new on my bench..
By email: You can sign up by providing your email and you will be notified of new blog posts plus special offers. Make sure you confirm your subscription request by clicking the link in the email.
By following me on Pinterest: Lisa Yang Jewelry on Pinterest
By subscribing on YouTube: Lisa Yang Jewelry on YouTube
And Instagram: @lisayangjewelry
Comments
and give you a shout out from New Caney Texas!
Just wanted to mention keep up the good work!
Post a Comment