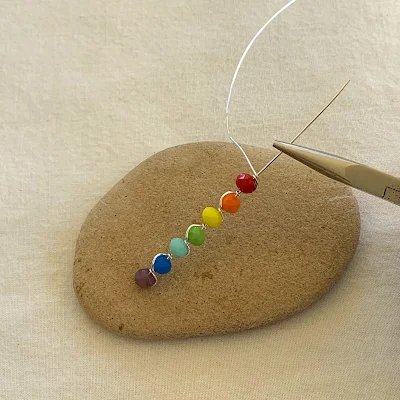
I have been wanting to make chakra rainbow colored jewelry for a long time, but one of the hardest parts has been finding the right beads. Finally, I lucked out with a large quantity of these beautiful multi-color glass crystal beads and they had all the colors I needed... and more.
I use a simple wire wrap technique to make this stick design that is perfect for pendants, but will also work for earrings or could be adapted for a bracelet.
First, some important information - I received these crystal beads as part of the beebeecraft.com YouTube promotion program. I received about $40 worth of beads, free of charge, in exchange for making three videos - an unboxing and two tutorials. There's no other obligation on my part - so I technically don't need to tell you about the beads or the program here, I just really like them enough to. The beads for this tutorial are NBEADS 20 Strands Pearl Luster Plated Imitation Jade Faceted Abacus Mixed Color Electroplate Glass Beads Strands with 6x4mm,Hole: 1mm,about 95pcs/strand .
If you'd like to see the other goodies I got, here is the unboxing video.
So, back to the pendant tutorial. The biggest problem I was having was finding the right colors and sizes of beads for my pendant.
Chakra energy centers have seven colors - red, orange, yellow, green, blue, indigo and violet. Sometimes white is substituted instead of blue and indigo. Rainbow colors, often used in gay rights symbols, use the same colors.
One thing I found out after I published my video tutorial - the difference between the two is typically the order. The rainbow progresses from red at the top to violet at the bottom while chakra starts with violet or white at the top and progresses to red. This corresponds with the order of the chakra centers in the body which progress from the root chakra (red) at the base of the spine to the crown chakra (violet) at the top of the head.
Now you can decide whether you want a rainbow pendant or a chakra pendant. To get started, gather your supplies.
You will need seven colors of beads and 22 gauge wire along with your essential wire wrap jewelry tools.
Start off by cutting a piece of wire about eight to ten inches long. The length will depend on the size beads you are using. Slide your first bead about four inches from the end of the wire. Yes, the photo shows three, but that was cutting it too close, so four is better.
Wrap the wire around the side of the bead, over the front of the wire, and wrap it around the wire running down the center of the bead one full turn. I'll refer to the center wire as the core wire and the other as the wrap wire. Note this first bead is the hardest because it's difficult to get a good grip to make the wraps.
After you've wrapped one full turn, add the next bead to the core wire. With the wrap wire, repeat the same process. It's easier to take photos once there are some beads in place, so here is the bead added, and bringing the wrap wire in front of the core wire.
After one full wrap, the wire will be facing the same direction it started.
Continue adding beads and wrapping around the side of the bead and around the core bead until all beads are added. If you start with violet, you will be making a rainbow pendant, if you start with red, it is a chakra pendant. The colors in order are red, orange, yellow, green, blue, indigo, and violet (or white).
Trim the wrap wire close to the core and tuck it in with flat nose pliers.
Use the core wire and your round nose pliers to make a wrapped loop to hang the pendant.
Add a chain or ribbon of your choice - or make another and add ear wires. See below for the video tutorial to make these.
If you would like to be notified of new projects, please sign up or follow me one of these ways.
By email: You can sign up by providing your email and you will be notified of new blog posts plus special offers. Make sure you confirm your subscription request by clicking the link in the email.
By following me on Pinterest: Lisa Yang Jewelry on Pinterest
By subscribing on YouTube: Lisa Yang Jewelry on YouTube
And Instagram: @lisayangjewelry


Very nice, good instructions, thank you for sharing.
ReplyDeleteGlad you like it and found it helpful!
DeleteI love this design and have never done any wire-wrapping. It is a perfect first project. Thank you :)
ReplyDeleteThese are so pretty, and you've made the instructions clear and concise. Thanks for sharing it!!
ReplyDeleteLove the design....I have these same beads.....awesome awesome gift idea...thank you for sharing
ReplyDelete