Updated for 2025! Now with clearer photos, step-by-step visuals, and tips to help beginners succeed.
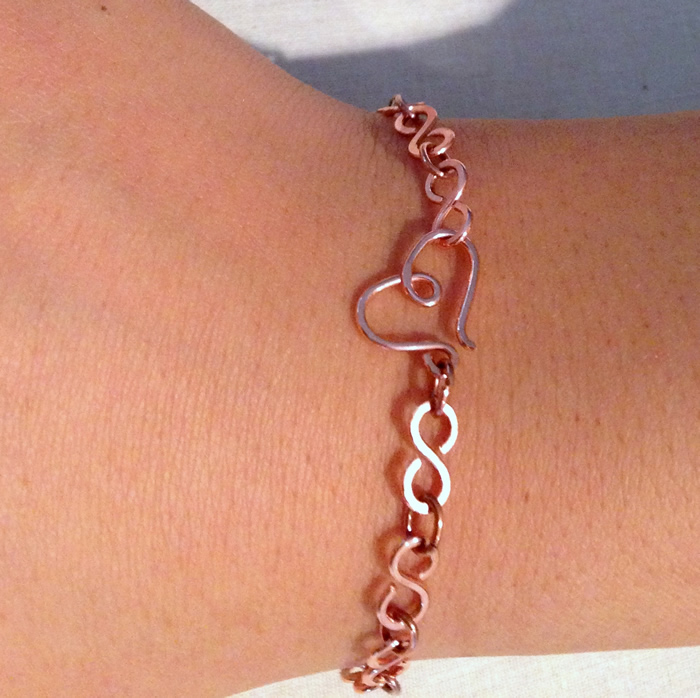
In this free tutorial, you'll learn how to make a decorative wire heart clasp using just a few tools and basic wire bending techniques. It's a perfect beginner project for a thoughtful handmade closure for bracelets and necklaces. It pairs beautifully with the infinity link chain project pictured above.
Techniques You'll Use in This Wire Heart Clasp Tutorial
In this tutorial, you'll learn several essential techniques, including how to make an open wire loop, how to smooth wire ends, and optionally, how to hammer and tumble your jewelry for a polished finish. You'll also practice shaping the wire using round nose pliers or stepped mandrel pliers to create the perfect heart clasp.
Materials
To make this wire heart clasp, you'll need the following tools and supplies.
(Links below are to Amazon for your convenience — I may earn a small commission if you purchase through them, at no extra cost to you.)
Essential Supplies
- 18 gauge round wire (ParaWire works great)
- Round nose pliers or stepped mandrel pliers
- Wire cutters
- File or emery board
Optional (for finishing your clasp)
Instructions
1. Cut and Prepare Your Wire

Cut a piece of 18 gauge copper wire approximately 2.5 inches (65 mm) long. Smooth both ends using a file or emery board to remove any sharp edges.
Tip: When you're first learning, it's easier to start with a slightly longer piece of wire and trim the excess after shaping. The length you choose will affect the final size of your clasp — mine typically measures about 15 mm x 15 mm (or 5/8" x 5/8").
If you plan to make a larger clasp, consider using 16 gauge wire for added strength. It may be harder to bend into shape, but it will hold up better under tension and resist bending out of shape.
I recommend ParaWire copper-based craft wire, which comes in a variety of vibrant colors. Here's why ParaWire is one of my favorite craft wires.
2. Center the Wire

Use your round nose pliers to grasp the wire at its midpoint. You can simply eyeball the center — or measure it if you prefer precision.
Don’t worry if the heart ends up slightly off-center; that slight asymmetry adds to its handmade charm.
3. Form a “U” Shape

With the pliers still gripping the center of the wire, bend both ends up and around the tip of the round nose pliers to create a smooth “U” shape. This will be nade into a loop for the top center of the heart.
Tip: Try to keep the bends even on both sides — but don’t worry if it’s not perfect. Small differences enhance the handmade look.
4. Shape the Top of the Heart

Continue bending one wire end around the pliers to form a loop. Keep wrapping until the wires cross just past the center, creating a slight “V” shape for the top of the heart.
If the wires cross at too shallow of an angle (or lie straight), the top of your heart will look flat. Adjust the crossing point to form a gentle V — this gives the heart its classic shape and definition.
5. Start the First Heart Curve

Grip one wire end with the thicker part of your round nose pliers, positioning the pliers right next to the loop you just made.
Gently bend the wire over the barrel of the pliers to start forming the rounded top curve of one side of the heart. You can also use stepped mandrel pliers for a more consistent curve if you prefer.
6. Refine the Curve

Continue shaping the wire a little at a time, working gradually away from the center loop. Slide the pliers slightly down the wire after each small bend to form a smooth, gentle curve.
Avoid wrapping the wire tightly around the plier barrel — this will create a sharp bend instead of a soft curve. Small, controlled adjustments give you better results and help maintain the heart’s elegant shape.
7. Form the Second Half of the Heart

Once the first curve is shaped, repeat the same process with the other wire end. Use your round nose pliers to make gentle, gradual bends, working outward from the center loop.
Aim to mirror the first side as closely as possible to complete the heart shape. Don’t worry if it’s not perfectly symmetrical — the handmade look adds charm!
8. Take a Look at Your Heart

You’re almost there! At this point, you should see the full heart shape starting to come together. Adjust the curves as needed so both sides are balanced and smooth.
9. Adjust and Align the Wires

Make small adjustments to refine your heart shape, ensuring both sides are smooth and balanced. Try to position the wire ends so that one is slightly longer than the other.
You’ll use the longer wire to create the final loop that attaches the clasp to your jewelry.
10. Make the Attachment Loop

Use your round nose pliers to create a simple loop with the longer wire end. Bend the wire outward and around the pliers to form the loop just outside the heart shape.
This loop will be used to connect the clasp to your jewelry, so make sure it’s fully closed and securely shaped.
Optional: For extra security and a polished finish, you can wrap the wire tail around the base of the loop. To do this, start with a longer piece of wire and leave a longer tail on one side before forming the loop.
11. Create the Catch

Gently bend the other end of the wire outward just a little to form a catch. This small bend will help guide a jump ring into the clasp when you attach it to your jewelry.
Use an emery board, nail file, or buffer to smooth the wire end, ensuring there are no sharp edges that could snag or scratch.
12. Refine and Smooth Your Clasp

Finish by tidying up the shape of your heart clasp. I like to use Three Step Wire Looping Round Nose Pliers (5mm, 7mm, and 10mm jaws) because their small, stepped jaws fit perfectly to smooth and shape the rounded top of the heart.
Another great option is the 6-step round nose pliers, which also help create consistent curves.
If you don’t have specialty pliers, you can use any stiff, round object of similar size—like the top of a pen—to gently reshape and smooth the clasp.
12. Finish and Strengthen Your Clasp

Your heart clasp is now complete! However, it may need a bit more work to be strong enough for everyday use.
To work harden the wire and increase its durability, you can:
-
Lightly hammer the clasp on a steel bench block or anvil.
-
Or place the clasp in a tumbler with stainless steel shot to smooth and harden it.
Sometimes, the wire hardens enough just from bending it, but light hammering not only strengthens the wire—it can also add a subtle decorative texture.
If you’re new to hammering techniques, check out my article: Mallet or Hammer; Which Should You Use and When?
Now, Add Your Clasp to Something Fabulous!

For example, I recently paired mine with the infinity link chain I made — it’s the perfect complement!
I’d love to hear how your wire heart clasp turns out! Feel free to leave a comment below with your tips, questions, or photos of your finished clasp. And if you found this tutorial helpful, please share it with your friends or fellow jewelry makers — sharing inspiration helps our creative community grow!
Love Wire Heart Designs? Try These Projects:
Never Miss a Project!
Get notified whenever I post new tutorials and inspiration — sign up by email, or follow me on Twitter, Facebook, and all your favorite social media platforms.
Find all the options on my Social Media and Contact page.
Comments
Lynda
-Amelia at http://thebeadgoeson.com/blog/
(((HUGS))) Halina in Australia
Post a Comment