Good Luck!
Yes, I'd like some please!
 This particular post and jewelry project all started with a search for a good luck symbol. I considered several options before settling on a horseshoe.
Why are horseshoes lucky?
I tried to research why horseshoes are considered lucky - but there is no clear source for the belief, just a lot of speculation. Clearly, there is a lot of superstition regarding which way you should hang your horseshoe though. Some say with the ends up so the luck doesn't run out, others believe with the ends down, so the luck pours on those who pass underneath it. Regardless of the source of the belief, they are a prominent symbol in jewelry and luck, so I decided to try my hand at it by making this horseshoe chain bracelet.
Free horseshoe chains video tutorial
During my search, I found this great free video tutorial for horseshoe chains by Lisa Niven Kelly, on which my picture tutorial is based. This is first of three chain styles she demonstrates how to make in the video.
This chain uses many of the skills that I've written about in recent posts - making a simple wire loop and hammering for pattern and strength. I think it is a beginner wire project and unlike the hammered wire bones link chain - it comes together very quickly!
 It also demonstrates the use of another tool that I love - the small multi-step looping pliers. When I started making jewelry, I didn't have anything like this and improvised with items I would find around the house - like the barrel of a sharpie marker. But if you know you love working with wire, this tool is well worth the money. Using it, consistent sized loops and curves are super easy.
How to make horseshoe links
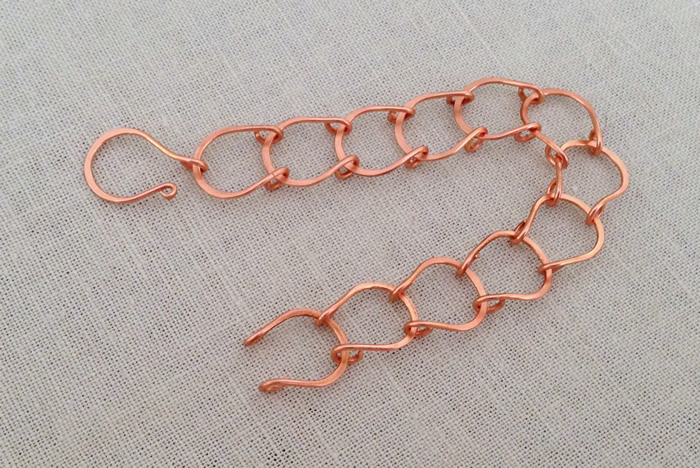
For this project, I used 18g copper wire. Each link uses 2 inches of copper wire and makes a link that is approximately 1/2 inch long.


Using your round nose pliers, make a loop on each end of the wire. The loops need to be big enough to hold another piece of 18g wire.

Using your small step pliers or a mandrel that is about 1/2 inch in diameter, center the wire and curve it around the barrel.

The two loops should be close together and evenly spaced at the top. Notice that the loops are facing the same direction.

Here's another view of making the horseshoe curve in the wire.

Your completed link will look like this.

Hammer the curve part of the link using your chasing hammer. This helps accentuate the horseshoe shape. The link may separate a little when you are hammering and the shape may need to be adjusted.

To join the links, open the loops by bending them towards the outside using your chain nose pliers.

Slide the link through the loops and then turn the loops closed again.

Your chain is starting to form.

Continue adding links until your chain is the desired length.
Lisa Niven Kelly gives instructions for this simple hook which integrates into the look of the chain very nicely. You hook it through the two open loops of the last link and it gives a seamless look to the chain.

I am very satisfied with this chain. It is surprisingly slinky since the links are free to move in a horizontal and vertical direction with no way to get stuck or kink.
My last step will be patina and polish - and I have another bracelet. Lucky Me!
Comments
Post a Comment