Crimping... My Style
I've mentioned in the past that jewelry crimping - i.e. using crimp pliers to secure crimp tubes to bead stringing wire, is not my favorite jewelry making activity.
As a matter of fact, I'm far more likely to use crimp pliers to make paddle headpins than I am to use them to actually secure crimps.

But that may be about to change!! I finally got my Om Tara crimp pliers - and I think they may be as great as one of my jewelry making friends insisted they are.
I decided to get the Om Tara Dual Crimper - because two is always better than one right?
Well, that's what I was thinking at least. As it turns out, I would probably buy the regular Om Tara crimper with one crimp slot if I had to do it again. So far, I've found that the big crimp slot works for everything, so having the smaller crimp slot there just makes me feel like I have a decision to make whenever I crimp. But they were priced about the same, so I guess I felt like I was getting a better deal. (sneaky marketing!)

So, what really makes this crimper different (aside from the significant price tag). I should start by saying by regular crimpers were probably about $5.00 from the craft store. The Om Tara (which I purchased - no freebie here), were close to $40!!! When a friend told me these were the best crimpers she ever used, I remember thinking - well, they better be for that price!
But, here I am a month later having taken the plunge. Over time, I am slowly learning that it is important to buy the best jewelry tools you can afford. And most of all, I know I avoid stringing beads because I never know when the crimp will fail, and that makes me uncomfortable selling or giving strung items as gifts even.

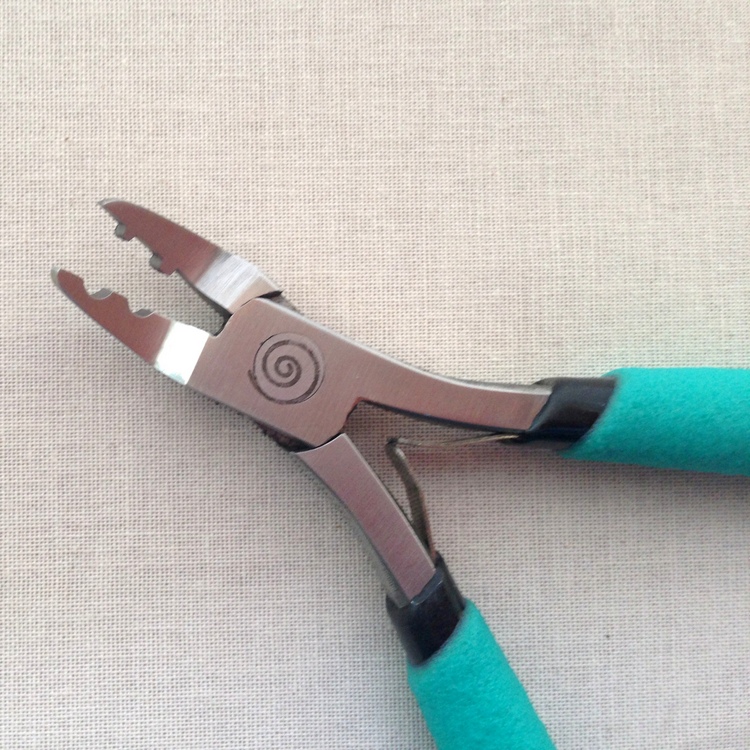
Back to the differences. On regular crimpers, you use the first slot to crease the crimp and the second slot to fold it over. Ideally, the little tooth in the first slot is going to go right between the beading wires inside the crimp.
For me, holding the pliers, with the string of beads, positioning the crimp in the right slot of the crimper tool, while holding the beading wires parallel and pushing the crimp close to, but not right on top of, the clasp and then squeezing is just a little too much to ask.

Hopefully, you can see the difference in style of the Om Tara Crimp Plier. It has teeth that push down on the crimp to secure the wires no matter how they are positioned in the crimp. And folding the crimp after is completely optional.
And the other side of the plier is curved, so the resulting crimp is gently curved and compressed against the wires.

This is a crimp made with the Om Tara pliers. Gently curved, fairly flat in the middle.

This is a crimp done with regular pliers - one of the few where my beading wire stayed parallel and the crimp was in the right place. But you can see that it's a sharp crease in the crimp. That makes it easy to crack the crimp down the middle - especially if you are folding the crimp as a next step.
Theoretically - I can see how the Om Tara crimp will be more secure, is easier to position correctly (since there is no wrong position) and will be less likely to fail due to a cracked crimp. But, the only way to know for sure is to try it.
Next up - I'll be making some multi-strand strung bracelets so I can test the crimps.
If you have an Om Tara crimper, I'd love to know your experience in the comments. It's always nice to have another opinion.

Oops. I almost forgot this picture - which is what didn't thrill me about my new Om Tara crimp pliers. When I spend a lot of money on pliers - be they Lindstrom, Wubbers, or Om Tara - I really expect to see precision and quality. And well - the second smaller crimp area just doesn't look good to me. The tooth is wonky and uneven within the crimp groove.
It works fine - and I guess that's what's important, and I prefer the larger crimp spot anyway, but when a tool costs multiple times more - I like to see precision. Another note is that Om Tara tools (including this plier) are manufactured by EuroTool since the beginning of the year.
By liking my page on Facebook: Lisa Yang Jewelry on Facebook
But that may be about to change!! I finally got my Om Tara crimp pliers - and I think they may be as great as one of my jewelry making friends insisted they are.
I decided to get the Om Tara Dual Crimper - because two is always better than one right?
Well, that's what I was thinking at least. As it turns out, I would probably buy the regular Om Tara crimper with one crimp slot if I had to do it again. So far, I've found that the big crimp slot works for everything, so having the smaller crimp slot there just makes me feel like I have a decision to make whenever I crimp. But they were priced about the same, so I guess I felt like I was getting a better deal. (sneaky marketing!)

So, what really makes this crimper different (aside from the significant price tag). I should start by saying by regular crimpers were probably about $5.00 from the craft store. The Om Tara (which I purchased - no freebie here), were close to $40!!! When a friend told me these were the best crimpers she ever used, I remember thinking - well, they better be for that price!
But, here I am a month later having taken the plunge. Over time, I am slowly learning that it is important to buy the best jewelry tools you can afford. And most of all, I know I avoid stringing beads because I never know when the crimp will fail, and that makes me uncomfortable selling or giving strung items as gifts even.

Back to the differences. On regular crimpers, you use the first slot to crease the crimp and the second slot to fold it over. Ideally, the little tooth in the first slot is going to go right between the beading wires inside the crimp.
For me, holding the pliers, with the string of beads, positioning the crimp in the right slot of the crimper tool, while holding the beading wires parallel and pushing the crimp close to, but not right on top of, the clasp and then squeezing is just a little too much to ask.

Hopefully, you can see the difference in style of the Om Tara Crimp Plier. It has teeth that push down on the crimp to secure the wires no matter how they are positioned in the crimp. And folding the crimp after is completely optional.
And the other side of the plier is curved, so the resulting crimp is gently curved and compressed against the wires.

This is a crimp made with the Om Tara pliers. Gently curved, fairly flat in the middle.

This is a crimp done with regular pliers - one of the few where my beading wire stayed parallel and the crimp was in the right place. But you can see that it's a sharp crease in the crimp. That makes it easy to crack the crimp down the middle - especially if you are folding the crimp as a next step.
Theoretically - I can see how the Om Tara crimp will be more secure, is easier to position correctly (since there is no wrong position) and will be less likely to fail due to a cracked crimp. But, the only way to know for sure is to try it.
Next up - I'll be making some multi-strand strung bracelets so I can test the crimps.
If you have an Om Tara crimper, I'd love to know your experience in the comments. It's always nice to have another opinion.

Oops. I almost forgot this picture - which is what didn't thrill me about my new Om Tara crimp pliers. When I spend a lot of money on pliers - be they Lindstrom, Wubbers, or Om Tara - I really expect to see precision and quality. And well - the second smaller crimp area just doesn't look good to me. The tooth is wonky and uneven within the crimp groove.
It works fine - and I guess that's what's important, and I prefer the larger crimp spot anyway, but when a tool costs multiple times more - I like to see precision. Another note is that Om Tara tools (including this plier) are manufactured by EuroTool since the beginning of the year.
Jewelry Making Tips Delivered
By email: You can sign up by providing your email and you will be notified of new blog posts plus special offers. Make sure you confirm your subscription request by clicking the link in the email.
By following me on Pinterest: Lisa Yang Jewelry on Pinterest
By subscribing on YouTube: Lisa Yang Jewelry on YouTube
And Instagram: @lisayangjewelry
Comments
Post a Comment