I seem to be beading a lot of tubes and spirals lately. The latest is this Cellini Spiral, which is a nice way to say tubular peyote with graduated sized beads.
It is fabulous though. A bit of a marvel to look at, and surprising easy to create (the way beadwork should always be, in my opinion!)
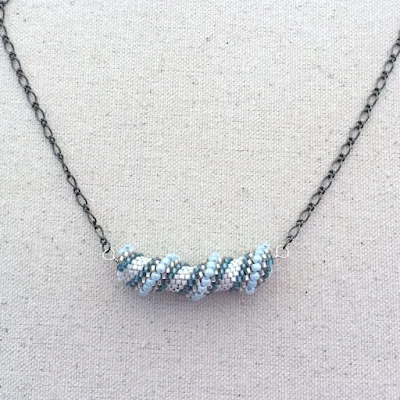
It's been challenging trying the various tubular beadwork techniques, but the hardest part for me is maintaining tension and getting the tube started. For the first couple of rounds, it's hard to tell which row is which and the beadwork wants to go in a circle outward instead of a tube upward. I think I've finally met the challenge and won though.
A lot of beadwork tutorials, including my own, will tell you that the secret is to hold the beadwork on a tube of some sort to help it keep the tubular shape and maintain tension. I started by using a tube of rolled paper, which was an incredibly bad option for me, I won't even show you the pictures.

Ah, what they heck, here's a picture. This tubular peyote stitch bead started off ok, but within a couple of rounds, the paper was crushed and bent or unrolling or ripping. This was definitely not for someone like me with a somewhat vigorous approach to thread tension.

As luck would have it, I purchased a random bag of metal tubes at the Craft and Hobby Association show and soon realized that those metal tubes would be the perfect core for my tubular beadwork. Or so it seemed. I tried it out on this tubular netting tutorial.
It did work better than the paper, since it never bent, crumbled or tore, but it also wasn't quite right either. This time, I think it had to do with the smoothness of the metal. The beadwork was always sliding around the tube when I pulled on the thread. It was more manageable than the paper, but still not quite perfect. Especially for the number of tubular beadwork projects I've been making.

And, as luck would have it, I think I have finally stumbled upon my favorite and ultimate tubular beadwork holding solution - wooden dowels.


I purchased a wooden dowel value pack , which is far more wooden dowels than I think I will ever need, but it has the perfect sizes. The dowels themselves are a little too long for beadwork, but after cutting some to 4 inches long and others to six inches long, I've decided the six inch ones are the perfect length for my beadwork.
The package contains 50 twelve inch dowels: 6 each of 1/8 inch, 3/16 inch, 1/4 inch, 3/8 inch, 7/16 inch, 1/2 inch, 5/8 inch and eight of the 5/16 inch. OK - so I have a few extras. I have a few extra beads too. :)
The size variety in the package is perfect and the wood is smooth but has just enough texture to keep the beadwork from sliding around when you pull on the thread. Unfortunately, the only way to get the size variety was to buy this large package, but the price is under $10, so I think it was worth it.
There's certainly a lot more you can do with wooden dowels than just hold your beadwork. If you don't have step pliers, for example, these could come in handy to help make round earwires, jump rings, etc.
In any event, if you thought this post was about how to do Cellini spiral beadwork, just follow the link. I hope you find the information on how to hold tubular beadwork helpful while you are learning.

One other tip for using a dowel to hold the beadwork is to make sure you use one size smaller than the finished beadwork tube is turning out to be. How would you know what one size smaller is while you are making it? Just make sure the project is loose on the dowel.
I thought the dowel I used for this Cellini spiral was the perfect size because the beadwork just fit on it without showing thread. After the first few rounds, I removed it from the dowel and realized the tension was tight to the dowel, but a little too loose. Nothing terrible, but I would have like the start to be a little bit tight like the end of the tube is since there is a curved glass bead inside that gives it the shape.
Ah well, it's always something! If you have any tubular tips, please leave them in the comments for me. As always, I'd love to hear from you or have you follow my jewelry making.
By liking my page on Facebook: Lisa Yang Jewelry on Facebook
It is fabulous though. A bit of a marvel to look at, and surprising easy to create (the way beadwork should always be, in my opinion!)

It's been challenging trying the various tubular beadwork techniques, but the hardest part for me is maintaining tension and getting the tube started. For the first couple of rounds, it's hard to tell which row is which and the beadwork wants to go in a circle outward instead of a tube upward. I think I've finally met the challenge and won though.
A lot of beadwork tutorials, including my own, will tell you that the secret is to hold the beadwork on a tube of some sort to help it keep the tubular shape and maintain tension. I started by using a tube of rolled paper, which was an incredibly bad option for me, I won't even show you the pictures.

Ah, what they heck, here's a picture. This tubular peyote stitch bead started off ok, but within a couple of rounds, the paper was crushed and bent or unrolling or ripping. This was definitely not for someone like me with a somewhat vigorous approach to thread tension.

As luck would have it, I purchased a random bag of metal tubes at the Craft and Hobby Association show and soon realized that those metal tubes would be the perfect core for my tubular beadwork. Or so it seemed. I tried it out on this tubular netting tutorial.
It did work better than the paper, since it never bent, crumbled or tore, but it also wasn't quite right either. This time, I think it had to do with the smoothness of the metal. The beadwork was always sliding around the tube when I pulled on the thread. It was more manageable than the paper, but still not quite perfect. Especially for the number of tubular beadwork projects I've been making.

And, as luck would have it, I think I have finally stumbled upon my favorite and ultimate tubular beadwork holding solution - wooden dowels.

I purchased a wooden dowel value pack , which is far more wooden dowels than I think I will ever need, but it has the perfect sizes. The dowels themselves are a little too long for beadwork, but after cutting some to 4 inches long and others to six inches long, I've decided the six inch ones are the perfect length for my beadwork.
The package contains 50 twelve inch dowels: 6 each of 1/8 inch, 3/16 inch, 1/4 inch, 3/8 inch, 7/16 inch, 1/2 inch, 5/8 inch and eight of the 5/16 inch. OK - so I have a few extras. I have a few extra beads too. :)
The size variety in the package is perfect and the wood is smooth but has just enough texture to keep the beadwork from sliding around when you pull on the thread. Unfortunately, the only way to get the size variety was to buy this large package, but the price is under $10, so I think it was worth it.
There's certainly a lot more you can do with wooden dowels than just hold your beadwork. If you don't have step pliers, for example, these could come in handy to help make round earwires, jump rings, etc.
In any event, if you thought this post was about how to do Cellini spiral beadwork, just follow the link. I hope you find the information on how to hold tubular beadwork helpful while you are learning.

One other tip for using a dowel to hold the beadwork is to make sure you use one size smaller than the finished beadwork tube is turning out to be. How would you know what one size smaller is while you are making it? Just make sure the project is loose on the dowel.
I thought the dowel I used for this Cellini spiral was the perfect size because the beadwork just fit on it without showing thread. After the first few rounds, I removed it from the dowel and realized the tension was tight to the dowel, but a little too loose. Nothing terrible, but I would have like the start to be a little bit tight like the end of the tube is since there is a curved glass bead inside that gives it the shape.
Ah well, it's always something! If you have any tubular tips, please leave them in the comments for me. As always, I'd love to hear from you or have you follow my jewelry making.
By email: You can sign up by providing your email and you will be notified of new blog posts plus special offers. Make sure you confirm your subscription request by clicking the link in the email.
By following me on Pinterest: Lisa Yang Jewelry on Pinterest
By subscribing on YouTube: Lisa Yang Jewelry on YouTube
And Instagram: @lisayangjewelry
Comments
Also, could you elaborate in your blog about how you are cataloging your beads?? Would love help with that.
I'll try to add a post in the future about my bead cataloging efforts. It's always, eternally a work in process because no matter how many beads I have, I always need more!
Post a Comment