Search This Blog

August 30, 2013

Wire Snake Charm - Created Intentionally This Time!


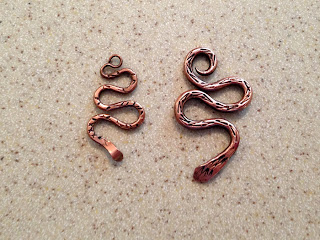
Yesterday, I shared my somewhat haphazard, accidental creation of a filed, forged, stamped copper snake charm.  Today, I created another intentionally.  This time, I used 10g wire and it made a much more substantial snake.  Which also leads me to believe yesterday's snake was 14g wire, not 12g as I initially thought.  You can see from the side by side, there is a big difference in the scale of the two snakes.


The snake gave me a great excuse to go to Harbor Freight and do a little tool shopping.  I used a 6 inch file for the first (garter) snake and I knew that would never work for the second (anaconda).  $2.00 later, I am the proud owner of a 12 inch file, and about $30 worth of other tool delights! But before I tell you about the tools, let me provide some details of my snake.

I filed the tail into a taper first.  I think I annealed once during the filing stage, but I'm not sure it made it go any quicker.  Filing takes as long as it takes - but it is somewhat meditative and soothing to shape the wire.  After filing, I had to anneal the wire in order to shape the snake.  After shaping, I used the "W" stamp to apply the pattern and I hammered the head end flat.  I filed the head into more of a diamond shape.  If When I try again, I may try to dome the head a bit using a doming punch in my vise to give it a little more shape.  The reviews on the second snake were very positive (2 out of 2 children preferred it!), but my daughter, forever the stickler about details, thinks it should have eyes!  You know if I do that, the open mouth or forked tongue is next...

Now, for the shopping!  I love Harbor Freight for jewelry tools and materials.  Check the link for some of my previous finds.  This trip, I got the following:  a magnetic tool holder for my peg board so I can have my most often used tools handy, a replacement belt for my harbor freight tumbler (even though it hasn't broken yet, I like to be prepared), a new pair of micro flush cutters, a handheld electric bug swatter for when I work at night in my garage with the door open and the bugs visit, and a set of 3 wire brushes to clean my files and other misc. tasks.  Oh, and a box of nitrile gloves because I know I'm not as careful as I should be about getting things like Liver of Sulphur on my hands.  I wish I had looked up these items online before I went shopping and I would have saved the money on the tumbler replacement belt.  It got horrible reviews!  I think I'll return it and buy a big box of rubber bands because I've heard they work too.


August 29, 2013

Wire Snake Charm - So Proud!

Do you ever make something that is ridiculously simple, but of which you are extremely proud?

That's today for me with the silly little snake charm.  It took way too long to make for what it is, and it probably could be done ten times better, but... it is what it is and I'm very satisfied with it.


It didn't even start off to be a snake.  It was going to be some nice copper hoop earrings, similar to the heavy copper forged earrings I've made before. Unfortunately, I jumped ahead and made the hoop before hammering the wire.  My next thought was to see if I could make them into more of an ancient style hoop by filing the 12g wire thin enough to make it into an earwire.  This thought came from watching a great wire wrap tutorial video by Dennis Hardy on YouTube.  He starts by filing the wire to taper it, and I realized I never tried that - so I dug out my neglected files and started tapering the wire.

At some point, I decided I was never going to file enough to get to ear wire thin - maybe they could be gauges - those ear wires that people use to expand their ear hole size, but they wouldn't be wearable earrings for me.  Then the snake came into my brain.  I've always loved snake jewelry, so it seemed like the easiest thing to do.  I added a few curves, flattened the head and pulled out my letter stamps to add texture (another thing I've rarely used).

The 'X' letter was the obvious choice for the snake skin, but it didn't work as well as I would have liked.  Admittedly, I wasn't trying very hard, but next time I would use a W or M.  I just think the design would be fuller without having to fiddle as much with the stamp.  I also would anneal before stamping too.


So, there you have it.  I'm already getting over the little fella, but I do feel like I learned a few new skills and had some fun making it.  And my kids could tell right away what it was supposed to be (which is not always the case - lol!).  I suppose this is a perfect project for wire scraps or mistakes.  And I think it will be perfect in a group of wire wrapped charms - possibly on a leather cord.  Or maybe attached to an earwire?

And, on another note, I'm right back to taking pictures with my i-Phone on my kitchen counter.  I've cleaned up an area to be my photo studio, but I just haven't had time to set up everything and practice.  Again, it is what it is, and I'm sure I will get to it soon.  I just hate not posting just because the pictures are no better than they've always been.

August 05, 2013

Ases Style Earrings: Beading Tips and Tricks


Aloha!  Sorry for the lapse in posts - I was site seeing in Maui for the past week.  It was fabulous!  The picture above is from Haleakala Crater - at 10,000 feet elevation, high above the clouds on the Island. Surprisingly, I didn't have as much time to make jewelry on vacation as I expected.  I imagined I would have nothing but time to relax on the beach or at the pool with beads and wire - finding shells on the beach to wrap, etc.  Nope - none of that!  Instead it was snorkeling, hiking, zip lining, banana boating, paddle boarding, eating and drinking.  And no shells!!  I've never been to such a beautiful beach that has no shells!  Lots of coral and lava though.

But, I did manage to do some beading on the plane on the way home.

I didn't want to attempt to carry on my tools, so I figured this was a good time for me to try my hand at more Miguel Ases style beading.  I have made a few more practice items, but this is my first complete pair of earrings since the first ones I made for a swap last year.

Since I didn't have scissors, the big challenge was how to cut the fireline thread for each of the components.  Any guesses how I did it?  No, my teeth are not that sharp!  I used the sharp edge of the soda can opening.  It still took considerable effort, but it worked.

I learned a lot making these earrings (besides that you can cut thread with a soda can)...  If you are interested in making this type of brick stitch earrings, here are my tips.

Tip 1:  Plan out how many beads you would like to surround your focal bead.

You are probably thinking how the heck do I know until I do it?  Yup - that's the point.  But you do need to know in order to space them evenly and get your thread tension correct.  Otherwise you'll end up with tight beads at the beginning and loose or crammed ones at the end.  And it will be very difficult to make your earrings match.

To plan how many I needed, I typically only had to bead 1/4 of the way around the bead.

Tip 2:  This may change as I get more experience, but I suspect it is easier if you start with the smaller beads and switch to larger beads as you move to subsequent rounds.  I'm sure that's not a rule, since I've seen plenty of earrings where it wasn't the case, but for these earrings, it worked.

Tip 3:  Try to plan how you will attach your components before you make your last round.  It will save you a lot of time figuring it out later.  These earrings took me as long to make the components as it did to add the jump rings and finish the ends.  Had I planned it out in advance, I definitely would have saved time.

Tip 4:  Make sure you leave a long enough thread tail at the start of your project to weave it into the project and tie it off correctly.  Yes - I was struggling with pieces of thread that were barely long enough to sew through with the needle attached.

I'll end this post with the first pair of Ases style earrings that I made.  I still think they are pretty good, but following my tips, I think I could make a pair that has a better shape with more balanced bead spacing.  I still like the shape of this design too, so I will give it another try some time soon.