Shine like the sun! This brick stitch beading reminds me of either the sun's rays or mountain tops. Of course, what it looks like will depend on the colors you choose.

This week, I decided to start using up some of the wire hoop findings that are in my stash. I have, what by normal people standards, is a lot of them (more than 150 pairs is a lot, right?).
Anyway, this will obviously be the first of possibly multiple upcoming hoop designs. These are super easy if you know how to do brick stitch.
Before I jump right in with the tutorial, I want to touch on the creative process.
When I first started making jewelry, I honestly thought every project I started should result in a perfectly wearable piece of jewelry. What a way to set yourself up for disappointment! The reality is that designs take time to develop and you need to learn how to do things. The only way to do that is to make some mistakes along the way.
So, here's my first pair of earrings in this style - the one with the mistakes. The earring on the right is passable, except I couldn't figure out how to secure the thread at the beginning and end. First, I used a stop bead - and forgot to remove it when I finished the earring. D-oh!
The earring on the left is better - I started figuring out how to start and tie off my thread, but as I was adjusting the beading, I broke off the earring post. That taught me that I should test each of my findings before I started beading. It couldn't have been properly attached to begin with in order to break so easily.

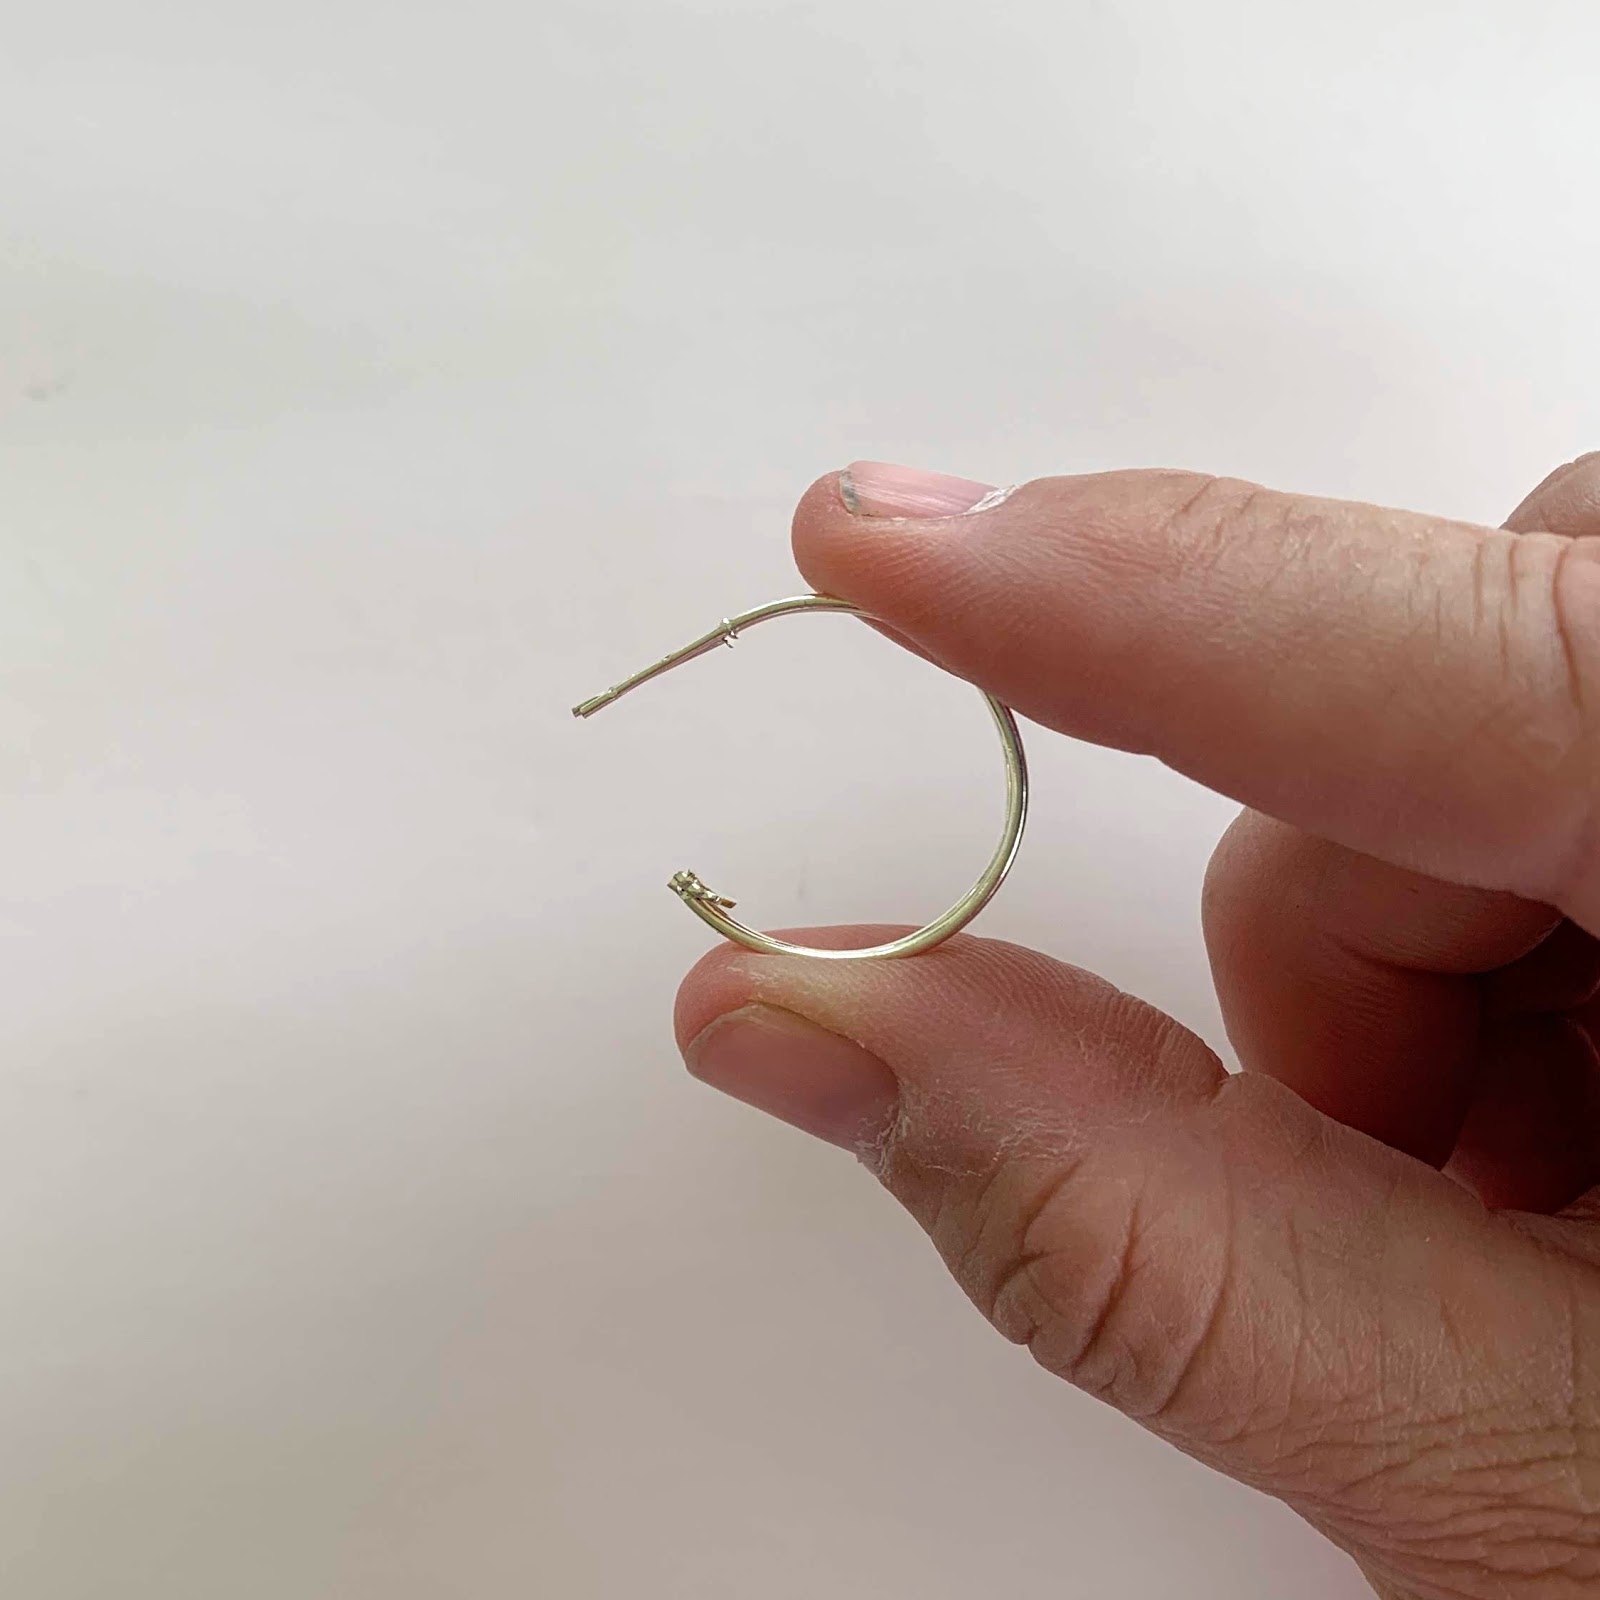
As I mentioned earlier, my starting point is a sizable stash of silver plated hoop earring findings. They are about 1 inch in diameter. I bought these are beading frames, so the wire diameter is not particularly thick. Unfortunately, the wire is a bit too soft, so if you use the attached flip close earring back, the wire hoop can bend out of shape. My solution is to cut off the earring back and replace it with metal or plastic earring backs.
To cut off the earring backs, always use sturdy, inexpensive wire cutters! They are made from what I affectionately call 'mystery metal' so you can't really tell how hard it will be. It's never worth risking your good cutters. I speak from way to much experience here.

Here's a small pile of disassembled hoops.

One final step is to find two hoops that match in size and shape, or to re-shape them to match. During this process, I also test that the post is securely attached. If necessary, I re-shape the hoops using my favorite plastic mandrel. If you don't have these plastic mandrels, just get them. One of my best $5 investments ever.
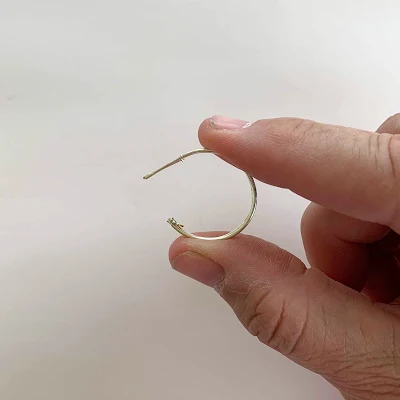
When the size and shape match - you're ready to get started!
One other thing that is kind of important to this design - once I cut off the earring back, a small tab where it was attached remains. This turns out to be great since it keeps the thread from sliding off the back of the hoop. I love it when that happens!
For one inch hoop frames, start with one full arm's length of thread plus a little extra. Tie the thread to the hoop with a square knot. I originally started working from the back of the earring to the front, but that was how I broke the post adjusting it. Now I start from the post end and work to the back. Either will work though.

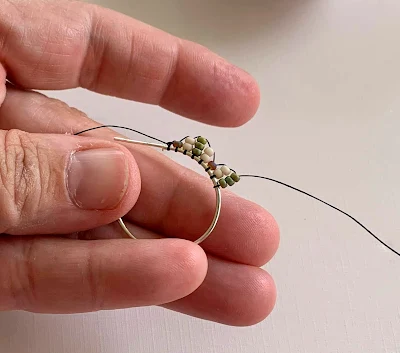
Attach the first bead with brick stitch. I should mention this pattern is simply a single row of brick stitch, alternating between regular one bead, two drop and three drop brick stitch. To brick stitch around the hoop is the same process as regular brick stitch except instead of passing under a thread bridge, you are passing under the hoop to secure your stitches.

Pull the thread tight and slide the bead next to the beginning of the hoop. For the second stitch, pick up two beads and make a brick stitch by sliding your beads down to the thread end, pass your needle through the hoop and pass back up through the beads. Make sure the beads are stacked and snugged up next to the first bead you added.
One of the more difficult parts of this project is thread tension. You need to make sure the stacks of beads are straight up and down, so tweak the tension of the thread bridges between each stack to make sure they are upright.

Continue adding beads using brick stitch. My pattern is single brick stitch, two drop, three drop, two drop and repeat. The pattern or colors you use are up to you.
Continue until you reach the end of the hoop. My hoops are perfectly sized for six iterations. Tie off the thread on the hoop using a square knot again. This is a little difficult and I can't take pictures while I'm doing it, but make a loop around the hoop and cross over and through the loop. To make the second half of the loop, you need to make a loop around the small thread bridge and put your needle through that loop and pull tight. Once I've made the knot, I stitch up and down through a couple of the bead stacks to hide the thread before cutting it off.

The finished hoop color variations. The first is single columns of one color, the second is rows of one color around each row around the hoop.

I used six pound crystal FireLine thread for the hoops below. I used Nymo size D in black from the spool for the striped version above. Both worked fine for this project. I always use Nymo from the spool, not the bobbins. The thread is different.

As a final step, I apply a layer of protect-a-clear to one side of the beadwork. I wrote a post about how to use protect-a-clear to stiffen beadwork. It has become an absolute necessity to me.
Just one coat keeps the beadwork in place on the hoop earring, so it doesn't slide around the frame. It also makes it stiff, which makes them easier to put on. I only did a single coat and I think that is enough. If someone is rough with the earrings, they can still be bent out of shape, but certainly they will maintain their shape far better than if you put nothing on them. If you use more than one coat, it coats the beads so they look like they're lacquered together. Not as nice in my opinion, but you should figure out what works best for you.
Once you've mastered the sunburst earrings, you may want to try this scalloped brick stitch version. I may try making these again too.

One last note about this project is that while these hoops look fabulous from the side, I was concerned that the are not as pleasing directly from the front. I'm happy to report after wearing a pair, they looked fabulous on my ears! They never sat directly forward like the picture below - and you could always see the design from some angle.

On a personal note, I'm happy to have some time to spend making jewelry and blogging again. I tend to stop writing and make less jewelry when my 'real' work gets busy and during baseball season.
If you've followed my blog since the beginning, you may know that I have always done a lot of my jewelry and wire work at the field during my children's baseball games. As they've gotten older, I make less and less during the games because the games have gotten more and more exciting. So, here's what's really exciting...
I'm incredibly proud and beyond excited to say that my son Eric is now officially a professional baseball player!!! He was drafted by the Cincinnati Reds this year and has started playing in the minor league for the Billings Mustangs (a Reds affiliate). Needless to say, I don't make jewelry at his games anymore, but you will soon see Reds themed jewelry. Of course, if you are a baseball fan, I hope you will cheer him on.

If you'd like to know when I publish new tutorials, videos or projects, please visit my Sign Up page for information on how to subscribe to emails or follow my social media accounts.

This week, I decided to start using up some of the wire hoop findings that are in my stash. I have, what by normal people standards, is a lot of them (more than 150 pairs is a lot, right?).
Anyway, this will obviously be the first of possibly multiple upcoming hoop designs. These are super easy if you know how to do brick stitch.
Before I jump right in with the tutorial, I want to touch on the creative process.
When I first started making jewelry, I honestly thought every project I started should result in a perfectly wearable piece of jewelry. What a way to set yourself up for disappointment! The reality is that designs take time to develop and you need to learn how to do things. The only way to do that is to make some mistakes along the way.
So, here's my first pair of earrings in this style - the one with the mistakes. The earring on the right is passable, except I couldn't figure out how to secure the thread at the beginning and end. First, I used a stop bead - and forgot to remove it when I finished the earring. D-oh!
The earring on the left is better - I started figuring out how to start and tie off my thread, but as I was adjusting the beading, I broke off the earring post. That taught me that I should test each of my findings before I started beading. It couldn't have been properly attached to begin with in order to break so easily.

As I mentioned earlier, my starting point is a sizable stash of silver plated hoop earring findings. They are about 1 inch in diameter. I bought these are beading frames, so the wire diameter is not particularly thick. Unfortunately, the wire is a bit too soft, so if you use the attached flip close earring back, the wire hoop can bend out of shape. My solution is to cut off the earring back and replace it with metal or plastic earring backs.
To cut off the earring backs, always use sturdy, inexpensive wire cutters! They are made from what I affectionately call 'mystery metal' so you can't really tell how hard it will be. It's never worth risking your good cutters. I speak from way to much experience here.

Here's a small pile of disassembled hoops.

One final step is to find two hoops that match in size and shape, or to re-shape them to match. During this process, I also test that the post is securely attached. If necessary, I re-shape the hoops using my favorite plastic mandrel. If you don't have these plastic mandrels, just get them. One of my best $5 investments ever.
When the size and shape match - you're ready to get started!
One other thing that is kind of important to this design - once I cut off the earring back, a small tab where it was attached remains. This turns out to be great since it keeps the thread from sliding off the back of the hoop. I love it when that happens!
For one inch hoop frames, start with one full arm's length of thread plus a little extra. Tie the thread to the hoop with a square knot. I originally started working from the back of the earring to the front, but that was how I broke the post adjusting it. Now I start from the post end and work to the back. Either will work though.

Attach the first bead with brick stitch. I should mention this pattern is simply a single row of brick stitch, alternating between regular one bead, two drop and three drop brick stitch. To brick stitch around the hoop is the same process as regular brick stitch except instead of passing under a thread bridge, you are passing under the hoop to secure your stitches.

Pull the thread tight and slide the bead next to the beginning of the hoop. For the second stitch, pick up two beads and make a brick stitch by sliding your beads down to the thread end, pass your needle through the hoop and pass back up through the beads. Make sure the beads are stacked and snugged up next to the first bead you added.
One of the more difficult parts of this project is thread tension. You need to make sure the stacks of beads are straight up and down, so tweak the tension of the thread bridges between each stack to make sure they are upright.

Continue adding beads using brick stitch. My pattern is single brick stitch, two drop, three drop, two drop and repeat. The pattern or colors you use are up to you.

Continue until you reach the end of the hoop. My hoops are perfectly sized for six iterations. Tie off the thread on the hoop using a square knot again. This is a little difficult and I can't take pictures while I'm doing it, but make a loop around the hoop and cross over and through the loop. To make the second half of the loop, you need to make a loop around the small thread bridge and put your needle through that loop and pull tight. Once I've made the knot, I stitch up and down through a couple of the bead stacks to hide the thread before cutting it off.

The finished hoop color variations. The first is single columns of one color, the second is rows of one color around each row around the hoop.

I used six pound crystal FireLine thread for the hoops below. I used Nymo size D in black from the spool for the striped version above. Both worked fine for this project. I always use Nymo from the spool, not the bobbins. The thread is different.

As a final step, I apply a layer of protect-a-clear to one side of the beadwork. I wrote a post about how to use protect-a-clear to stiffen beadwork. It has become an absolute necessity to me.
Just one coat keeps the beadwork in place on the hoop earring, so it doesn't slide around the frame. It also makes it stiff, which makes them easier to put on. I only did a single coat and I think that is enough. If someone is rough with the earrings, they can still be bent out of shape, but certainly they will maintain their shape far better than if you put nothing on them. If you use more than one coat, it coats the beads so they look like they're lacquered together. Not as nice in my opinion, but you should figure out what works best for you.
Once you've mastered the sunburst earrings, you may want to try this scalloped brick stitch version. I may try making these again too.

One last note about this project is that while these hoops look fabulous from the side, I was concerned that the are not as pleasing directly from the front. I'm happy to report after wearing a pair, they looked fabulous on my ears! They never sat directly forward like the picture below - and you could always see the design from some angle.

On a personal note, I'm happy to have some time to spend making jewelry and blogging again. I tend to stop writing and make less jewelry when my 'real' work gets busy and during baseball season.
If you've followed my blog since the beginning, you may know that I have always done a lot of my jewelry and wire work at the field during my children's baseball games. As they've gotten older, I make less and less during the games because the games have gotten more and more exciting. So, here's what's really exciting...
I'm incredibly proud and beyond excited to say that my son Eric is now officially a professional baseball player!!! He was drafted by the Cincinnati Reds this year and has started playing in the minor league for the Billings Mustangs (a Reds affiliate). Needless to say, I don't make jewelry at his games anymore, but you will soon see Reds themed jewelry. Of course, if you are a baseball fan, I hope you will cheer him on.

If you'd like to know when I publish new tutorials, videos or projects, please visit my Sign Up page for information on how to subscribe to emails or follow my social media accounts.
Comments
Post a Comment